本文所介绍的内容基于树莓派瑞士军刀扩展板(SAKS),由于 SAKS 基于树莓派通用的 GPIO 设计,文中的原理和代码也适用于其他情况。
本文由树莓派实验室创作,遵循CC协议(署名-非商业性使用-禁止演绎-相同方式共享),欢迎树莓派爱好者们遵循协议内容转载传播。谢绝不遵守协议的转载和抄袭。
本节非常简单,因为搞定树莓派的 GPIO 开发环境只需要几行指令。
目前在树莓派上流行的 GPIO 开发环境主要有两种,Python GPIO 和基于 C 语言的 wiringPi。我们推荐没有 C 语言基础的朋友直接选择 Python GPIO,因为 Python 不仅上手简单,而且其解释语言的特性使得程序不用编译,对代码做了任何修改之后就能直接运行,极大方便了调试。下面我们将分别对这两种开发环境的安装进行介绍。
Python GPIO 的安装
sudo apt-get install python-dev
sudo apt-get install python-rpi.gpio
安装完成之后,试着写一段简单的程序来验证下。就以点亮 SAKS 上红色的 LED 为例吧。
# -*- coding: utf-8 -*-
import RPi.GPIO as GPIO
import time
# BOARD编号方式,基于插座引脚编号
GPIO.setmode(GPIO.BOARD)
# 输出模式
GPIO.setup(24, GPIO.OUT)

while True:
	GPIO.output(24, GPIO.HIGH)
	time.sleep(1)
	GPIO.output(24, GPIO.LOW)
	time.sleep(1)
保存为 led.py,接着运行这个 Python 程序。
sudo python led.py
红色 LED 亮起,说明马上可以开始尽情开发了!
wiringPi 的安装
#如果之前没有安装过 git,执行下面的命令安装一下
sudo apt-get install git-core
sudo apt-get update
#下载 wiringPi
git clone git://git.drogon.net/wiringPi
#编译 wiringPi
cd wiringPi
./build
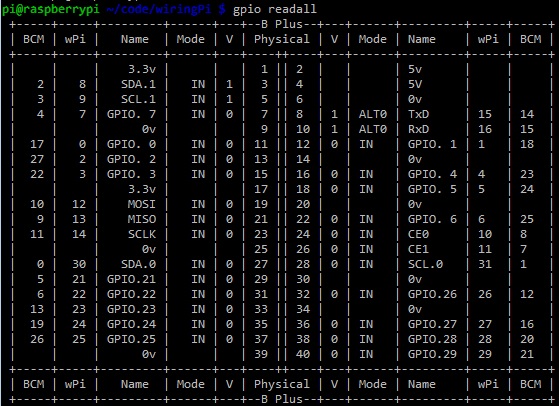
编译完成后,使用如下命令可以验证是否安装成功。
#显示版本信息
gpio -v
#显示GPIO信息
gpio readall
同样编写点亮红色 LED 的程序。
#include <wiringPi.h>
int main(void)
{
	wiringPiSetup();
	pinMode (10, OUTPUT);
	for(;;)
	{
		digitalWrite(10, HIGH); delay (500);
		digitalWrite(10, LOW); delay (500);
	}
}
保存为 led.c,然后编译、运行。
gcc -Wall -o led led.c -lwiringPi
sudo ./led
注意:以上IO的编号方式略有不同,采用wiring编码方式。-lwiringPi 表示动态加载 wiringPi 共享库。
好了,环境我们已经准备好了,后面我们后面将开始介绍如何基于 SAKS 扩展板 DIY 各种有趣、实用的东西,欢迎持续关注!
本文属于《树莓派瑞士军刀扩展板(SAKS)DIY 教程》系列文章,查看系列文章目录,请访问:https://shumeipai.nxez.com/swiss-army-knife-shield-for-raspberry-pi-diy-tutorials

安装wiringPi 时git不成功,试用备选方案(其实就是下载后手动解压编译)成功:
Click on this URL: (it should open in a new page)
https://git.drogon.net/?p=wiringPi;a=summary
Then look for the link marked snapshot at the right-hand side. You want to click on the top one.
This will download a tar.gz file with a name like wiringPi-98bcb20.tar.gz. Note that the numbers and letters after wiringPi (98bcb20 in this case) will probably be different – they’re a unique identifier for each release.
You then need to do this to install:
tar xfz wiringPi-98bcb20.tar.gz
cd wiringPi-98bcb20
./build
Note that the actual filename will be different – you will have to check the name and adjust accordingly.
快出教程~~~~