之前在《HiFiBox DAC 自定义红外遥控配置教程》中介绍了树莓派上红外遥控的编码学习和使用,并且实现了遥控控制音乐播放的功能。
以上方案是基于 lirc 提供的软件实现。有树莓派玩家提供了一种通过编程实现红外读取的方法(C语言实现),此方法在树莓派2B、RuneAudio_rpi2_rp3_0.4-beta_20160321 版本上验证通过。这里的红外接收方法和代码也可以用于树莓派的其他红外模块,期待大家举一反三的应用。
如果你是 HiFi DAC + RuneAudio 玩家,自己也懒得折腾,可以在修改好config.txt启用红外接收功能之后,直接下载已经编译好了的 irm 程序运行。那也就意味着你只需要从这里开始往下配置就好了:)
用 SSH 工具登录系统(默认用户名 root 密码 rune)
安装 gcc 编译器
pacman -Sy
pacman -S gcc
如果以上过程出错或更新很慢,可以遵循下面的方法修改软件源(可选步骤)。
nano /etc/pacman.d/mirrorlist
在第一个行添加中科大的软件源(树莓派3B对应armv7h,其他版本请参考这里修改)
Server = http://mirrors.ustc.edu.cn/archlinuxarm/armv7h/$repo
下载并安装 bcm2835
wget http://www.airspayce.com/mikem/bcm2835/bcm2835-1.52.tar.gz
tar zxvf bcm2835-1.52.tar.gz
cd bcm2835-1.52
./configure
make
make check
make install
P.S.树莓派实验室建议你这样用make命令,用于保存安装信息日志,这样需要卸载的时候方便查看哪些文件安装在了系统目录中,例如/usr/lib下的库文件
make >& LOG_make &
make install >& LOG_install &
修改 config.txt
nano /boot/config.txt
修改 /boot/config.txt 中的如下配置,如果这两行备注释了请取消其注释
dtoverlay=lirc-rpi
dtparam=gpio_in_pin=26
红外接收程序
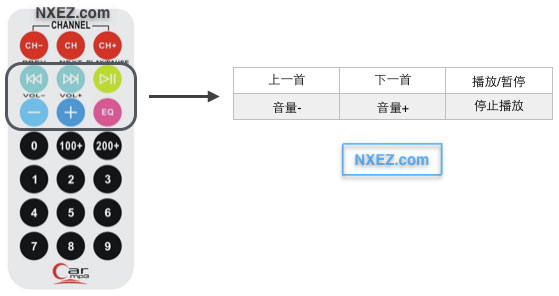
以下是 HiFiBox DAC 玩家刘磊编写好的程序,适配随板赠送的遥控器可直接使用。
#include <bcm2835.h>
#include <stdio.h>
#include <stdlib.h>

#define PIN 26
#define IO bcm2835_gpio_lev(PIN)
unsigned char i,idx,cnt;
unsigned char count;
unsigned char data[4];

static int flag = 0;
int exec_cmd(unsigned char key_val)
{
    switch(key_val) {
        case 0x45://CH-
            printf("Button CH-\n");
            break;
        case 0x46://CH
            printf("Button CH\n");
            break;
        case 0x47://CH+
            printf("Button CH+\n");
            break;
        case 0x44://PREV
            printf("Button PREV\n");
            system("mpc prev");
            break;
        case 0x40://NEXT
            printf("Button NEXT\n");
            system("mpc next");
            break;
        case 0x43://PLAY/PAUSE
            printf("Button PLAY/PAUSE\n");
            if (flag == 0) {
                flag = 1;
                system("mpc play");
            } else {
                flag = 0;
                system("mpc pause");
            }
            break;
        case 0x07://VOL-
            printf("Button VOL-\n");
            system("mpc volume -1");
            break;
        case 0x15://VOL+
            printf("Button VOL+\n");
            system("mpc volume +1");
            break;
        case 0x09://EQ
            printf("Button EQ\n");
            break;
        case 0x16://0
            printf("Button 0\n");
            break;
        case 0x19://100+
            printf("Button 100+\n");
            break;
        case 0x0d://200+
            printf("Button 200+\n");
            break;
        case 0x0c://1
            printf("Button 1\n");
            break;
        case 0x18://2
            printf("Button 2\n");
            break;
        case 0x5e://3
            printf("Button 3\n");
            break;
        case 0x08://4
            printf("Button 4\n");
            break;
        case 0x1c://5
            printf("Button 5\n");
            break;
        case 0x5a://6
            printf("Button 6\n");
            break;
        case 0x42://7
            printf("Button 7\n");
            break;
        case 0x52://8
            printf("Button 8\n");
            break;
        case 0x4a://9
            printf("Button 9\n");
            break;
        default:
            break;
    }

    return 0;
}

int main(int argc, char const *argv[])
{
    if (!bcm2835_init())
        return 1;

    bcm2835_gpio_fsel(PIN, BCM2835_GPIO_FSEL_INPT);
    bcm2835_gpio_set_pud(PIN, BCM2835_GPIO_PUD_UP);
    printf("IRM Test Program ... \n");

    while (1) {
        if (IO == 0) {
            count = 0;
            while (IO == 0 && count++ < 200)   //9ms
                delayMicroseconds(60);

            count = 0;
            while (IO == 1 && count++ < 80)    //4.5ms
                delayMicroseconds(60);

            idx = 0;
            cnt = 0;
            data[0]=0;
            data[1]=0;
            data[2]=0;
            data[3]=0;
            for (i =0;i<32;i++) {
                count = 0;
                while (IO == 0 && count++ < 15)  //0.56ms
                    delayMicroseconds(60);

                count = 0;
                while (IO == 1 && count++ < 40) //0: 0.56ms; 1: 1.69ms delayMicroseconds(60); if (count > 25)
                    data[idx] |= (1<<cnt);
                if (cnt== 7) {
                    cnt=0;
                    idx++;
                } else {
                    cnt++;
                }
                if ((data[0]+data[1] == 0xFF) && (data[2]+data[3]==0xFF)) {    //check
                    printf("Get the key: 0x%02x\n",data[2]);
                    exec_cmd(data[2]);
                }
            }
        }
    }
    bcm2835_close();
    return 0;
}
编译程序,测试
编译程序,得到 irm 这个文件之后就可以执行了。可用遥控器测试,能输出编码即正常。
gcc -Wall irm.c -o irm -lbcm2835
sudo chmod +x irm
sudo ./irm
如果你是 HiFiBox DAC + RuneAudio 玩家,自己也懒得折腾上面那些步骤,可以在修改好config.txt启用红外接收功能之后,直接下载已经编译好了的 irm 程序(for rpi 2b)运行。那也就意味着你只需要从这里开始往下配置就好了:)
设置开机自动启动
加入到开机启动,修改 rc-local.service(原始文件备份)
cp irm /usr/bin/irm
cp /usr/lib/systemd/system/rc-local.service /usr/lib/systemd/system/rc-local.service.backup
nano /usr/lib/systemd/system/rc-local.service
修改为以下内容:
[Unit]
Description=/etc/rc.local Compatibility
ConditionPathExists=/etc/rc.local

[Service]
Type=forking
ExecStart=/etc/rc.local
TimeoutSec=0
StandardOutput=tty
RemainAfterExit=yes
SysVStartPriority=99

[Install]
WantedBy=multi-user.target
开机自启动该 service
systemctl enable rc-local.service
现在添加 rc.local 文件
touch /etc/rc.local
nano /etc/rc.local
#!/bin/bash
/usr/bin/irm &
exit 0
授权、重启系统。
chmod +x /etc/rc.local
reboot
完成!
Reference:
https://archlinuxarm.org/platforms/
http://www.waveshare.net/study/article-622-1.html
http://www.airspayce.com/mikem/bcm2835/index.html
https://www.yumao.name/read/archlinux-systemd-rc-local/
via 刘磊

发表评论