在《用树莓派DIY共享鱼缸,支持微信远程喂鱼》一文中,使用了树莓派来做直播服务器。通过安装在树莓派上的摄像头采集实时视频数据流,推送至 RTMP 监听服务器。同时,其他的客户端访问这个 RTMP 服务器就可以观看视频了。下面我们来详细介绍这个模块如何搭建,文末还将给出将直播视频推送至斗鱼直播平台的方法。
需要用的东西和软件说明:
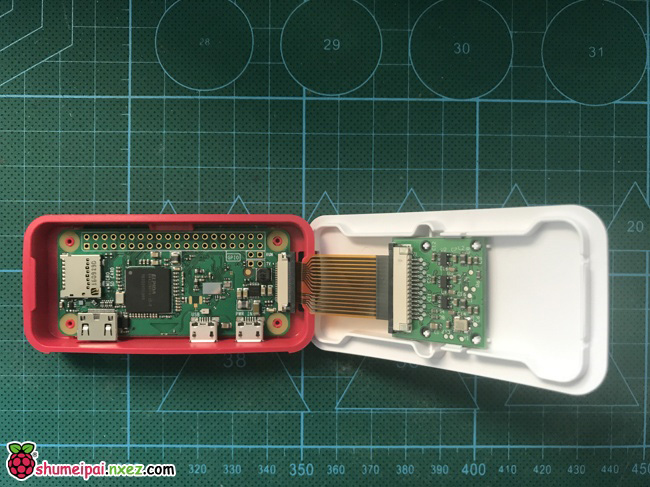
树莓派主板(本文使用树莓派 Zero W 套件,该套件附带一款完美安装摄像头的外壳)
兼容摄像头(本文使用官方摄像头模块,其他 USB 兼容摄像头亦可)
软件方面:
avconv 和 GStreamer 用于采集摄像头捕获的视频流并推送到 RTMP 服务
NGINX 和 RTMP 模块,用于接收视频流,同时提供视频发布功能
Strobe Media Playback,一款基于 Flash 的网页视频播放器
一、配置摄像头

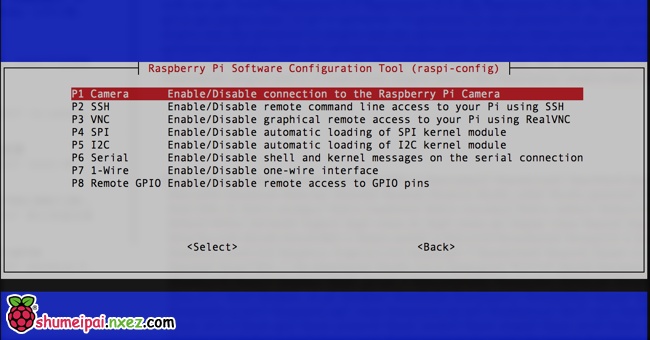
无论是树莓派官方摄像头模块还是其他兼容的USB摄像头,连接好摄像头之后,运行命令去启用摄像头:
sudo raspi-config
编辑系统模块文件。
sudo nano /etc/modules
在这个文件的最后添加一行
bcm2835-v4l2
保存。建议配置好之后重启一下树莓派。然后测试摄像头是否正常工作。
vcgencmd get_camera

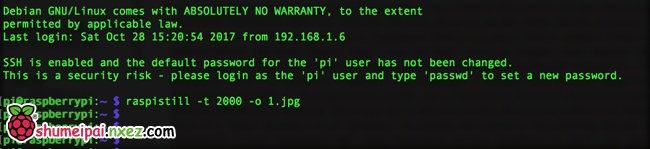
输出如图所示表示被识别到。进一步测试拍照。
raspistill -t 2000 -o 1.jpg
执行上面的指令之后,会你用摄像头拍照,并将照片保存在当前目录下,名为 1.jpg。
如果一切正常,恭喜!可以开始下面的步骤了!
二、网络配置
如果你的树莓派使用有线网络的话可以忽略这一步。笔者用的树莓派是 Zero W 版本,没有有线网口,所以必须手动配置无线网络。
sudo nano /etc/network/interfaces
将配置修改为:
auto lo
iface lo inet loopback

allow-hotplug wlan0
auto wlan0

iface wlan0 inet dhcp
        wpa-ssid "WIFISSID"
        wpa-psk "WIFIPASSWORD"
WIFISSID 和 WIFIPASSWORD 分别替换为你的 WIFI 的 SSID 和密码。
网络配置方法可以参考树莓派实验室的其他文章,例如这篇《树莓派 Raspberry Pi 设置无线上网》。
三、安装 NGINX 和 RTMP
我们用 nginx 加上 nginx-rtmp-module 模块作为 RTMP 服务端。这里先安装 nginx 然后再移除它,目的是利用这个过程吧 nginx 相关的依赖安装好并设定好系统环境。这个通过 apt 安装的 nginx 并不能直接使用,因为他并不包含我们需要的 RTMP 模块,所以将它移除。而后我们手工下载 nginx 和 nginx-rtmp-module 模块源码来手工编译安装,以获得我们最终需要的服务端。
sudo apt-get update
#安装 nginx
sudo apt-get -y install nginx
#移除 nginx
sudo apt-get -y remove nginx
sudo apt-get clean
#清空 nginx 的配置文件
sudo rm -rf /etc/nginx/*
#安装编译用的模块
sudo apt-get install -y curl build-essential libpcre3 libpcre3-dev libpcre++-dev zlib1g-dev libcurl4-openssl-dev libssl-dev
#创建存放网页的目录给 nginx 使用
sudo mkdir -p /var/www
#创建编译用的目录
mkdir -p ~/nginx_src
cd ~/nginx_src
#下载 nginx 源码包
wget http://nginx.org/download/nginx-1.11.8.tar.gz
#下载 nginx-rtmp-module 源码包
wget https://github.com/arut/nginx-rtmp-module/archive/master.zip
tar -zxvf nginx-1.11.8.tar.gz
unzip master.zip
cd nginx-1.11.8
#设定编译参数
./configure --prefix=/var/www --sbin-path=/usr/sbin/nginx --conf-path=/etc/nginx/nginx.conf --pid-path=/var/run/nginx.pid --error-log-path=/var/log/nginx/error.log --http-log-path=/var/log/nginx/access.log --with-http_ssl_module --without-http_proxy_module --add-module=/home/pi/nginx_src/nginx-rtmp-module-master
#开始编译安装
make
sudo make install
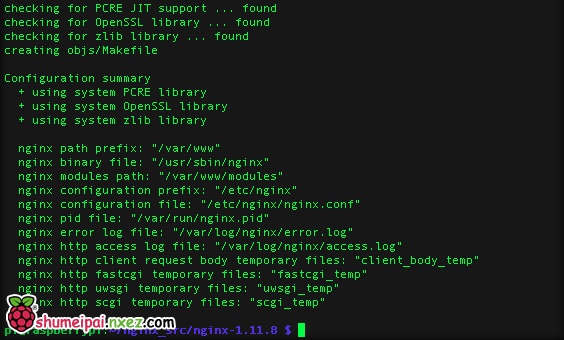
比较漫长的等待之后,编译安装结束。这时可以测试 nginx 是否安装好。
nginx -v
正常的話,會顯示 nginx 的版本。
配置 nginx。
/etc/nginx/nginx.conf
在末尾添加如下配置:
rtmp {
    server {
        listen 1935;
        chunk_size 4096;
        application live {
            live on;
            record off;
        }
    }
}
重启 nginx 服务。
sudo service nginx start
没有错误提示就表示成功了。
到这里 nginx 和 RTMP 模块都准备好了。
四、安装 avconv 和 GStreamer
安装的组件比较多,如果操作的时候因为软件源的问题总是出现错误难以完成,建议更换软件源试试。笔者用的是清华大学软件源安装的。
sudo nano /etc/apt/sources.list
deb https://mirrors.tuna.tsinghua.edu.cn/raspbian/raspbian/ stretch main contrib non-free rpi
deb-src https://mirrors.tuna.tsinghua.edu.cn/raspbian/raspbian/ stretch main contrib non-free rpi
开始安装
sudo apt-get update
sudo apt-get install libav-tools
#安装 GStreamer
sudo apt-get install gstreamer1.0-tools
#安装 GStreamer 扩展组件
sudo apt-get  install libgstreamer1.0-0 libgstreamer1.0-0-dbg libgstreamer1.0-dev liborc-0.4-0 liborc-0.4-0-dbg liborc-0.4-dev liborc-0.4-doc gir1.2-gst-plugins-base-1.0 gir1.2-gstreamer-1.0 gstreamer1.0-alsa gstreamer1.0-doc gstreamer1.0-omx gstreamer1.0-plugins-bad gstreamer1.0-plugins-bad-dbg gstreamer1.0-plugins-bad-doc gstreamer1.0-plugins-base gstreamer1.0-plugins-base-apps gstreamer1.0-plugins-base-dbg gstreamer1.0-plugins-base-doc gstreamer1.0-plugins-good gstreamer1.0-plugins-good-dbg gstreamer1.0-plugins-good-doc gstreamer1.0-plugins-ugly gstreamer1.0-plugins-ugly-dbg gstreamer1.0-plugins-ugly-doc gstreamer1.0-pulseaudio gstreamer1.0-tools gstreamer1.0-x libgstreamer-plugins-bad1.0-0 libgstreamer-plugins-bad1.0-dev libgstreamer-plugins-base1.0-0 libgstreamer-plugins-base1.0-dev
这里安装了 avconv 和 GStreamer 两套视频采集组件。 avconv 的使用方式是:
avconv -f video4linux2 -r 24 -i /dev/video0 -f flv rtmp://localhost:1935/live
avconv 采用软编码实现,因此 CPU 消耗比较高,推荐用 GStreamer,GStreamer 的采集使用如下命令:
gst-launch-1.0 -v v4l2src device=/dev/video0 ! 'video/x-raw, width=1024, height=768, framerate=30/1' ! queue ! videoconvert ! omxh264enc ! h264parse ! flvmux ! rtmpsink location='rtmp://树莓派的IP地址/live live=1'
如果希望在后台运行这两个命令可以在命令后面添加 & ,例如:
gst-launch-1.0 -v v4l2src device=/dev/video0 ! 'video/x-raw, width=1024, height=768, framerate=30/1' ! queue ! videoconvert ! omxh264enc ! h264parse ! flvmux ! rtmpsink location='rtmp://树莓派的IP地址/live live=1' &
device=/dev/video0 这个参数可以省去,除非在有多个摄像头的时候,希望指定视频采集自某个指定的摄像头才需要这个参数。
采集的视频怎么播放呢?请看下面介绍。
五、实时视频的呈现
有多种方式呈现直播视频画面:
1、使用 RTMP 播放器播放视频流
例如 VLC 等播放器(桌面版和手机版均有)支持 RTMP 视频流播放,填入 rtmp://树莓派的IP地址/live 即可播放。不过这个软件有数十秒的缓冲延迟,需要设定缓冲时间来缩短延迟。
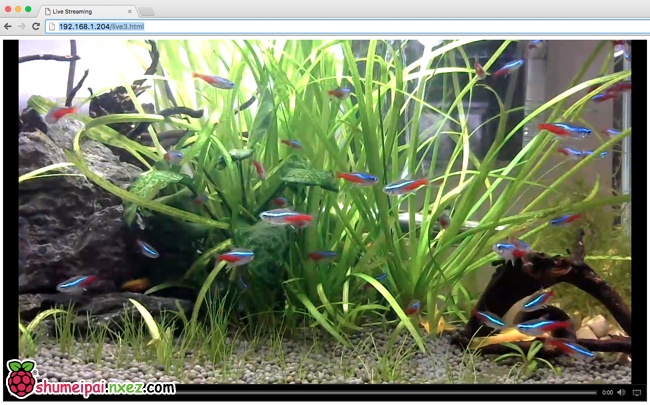
2、使用 Strobe Media Playback 创建播放页面,通过网页播放视频流
这个是在树莓派上创建一个带有播放功能的网页,播放器选用 Strobe Media Playback,当然你也可以选择其他支持 RTMP 的播放器控件。播放的时候用浏览器打开 http://树莓派的IP地址/index.html 进入播放界面。下面介绍这个播放页面的创建方法。
mkdir -p ~/strobe_src
cd ~/strobe_src
wget http://downloads.sourceforge.net/project/smp.adobe/Strobe%20Media%20Playback%201.6%20Release%20%28source%20and%20binaries%29/StrobeMediaPlayback_1.6.328-full.zip
unzip StrobeMediaPlayback_1.6.328-full.zip
sudo cp -r for\ Flash\ Player\ 10.1 /var/www/html/strobe
sudo nano /var/www/html/index.html
填入如下内容,记得把下面的“树莓派的IP地址”替换成你的树莓派实际的IP地址。IP地址可以通过 ifconfig 命令查看。
<!DOCTYPE html>
<html>
<head>
<title>Live Streaming</title>

<!-- strobe -->
<script type="text/javascript" src="strobe/lib/swfobject.js"></script>
<script type="text/javascript">
  var parameters = {
     src: "rtmp://{pi_address}/rtmp/live",
     autoPlay: false,
     controlBarAutoHide: false,
     playButtonOverlay: true,
     showVideoInfoOverlayOnStartUp: true,
     optimizeBuffering : false,
     initialBufferTime : 0.1,
     expandedBufferTime : 0.1,
     minContinuousPlayback : 0.1,
     poster: "images/poster.png"
  };
  swfobject.embedSWF(
    "strobe/StrobeMediaPlayback.swf"
    , "StrobeMediaPlayback"
    , 1024
    , 768
    , "10.1.0"
    , "strobe/expressInstall.swf"
    , parameters
    , {
      allowFullScreen: "true"
    }
    , {
      name: "StrobeMediaPlayback"
    }
  );
</script>

</head>
<body>
<div id="StrobeMediaPlayback"></div>
</body>
</html>
播放的时候用浏览器打开 http://树莓派的IP地址/index.html 进入播放界面。
3、推送至斗鱼直播平台观看
你可能注意到了 GStreamer 这个命令中有 location 这个参数。这个参数是设定采集到的视频流推向哪里,通过设定这个参数可以将视频流推向任何支持 RTMP 协议的服务器。
gst-launch-1.0 -v v4l2src device=/dev/video0 ! 'video/x-raw, width=1024, height=768, framerate=30/1' ! queue ! videoconvert ! omxh264enc ! h264parse ! flvmux ! rtmpsink location='rtmp://树莓派的IP地址/live live=1'
斗鱼平台同样采用了 RTMP 协议传输直播视频,以斗鱼平台为例来说明一下推流到斗鱼的方法。
首先获取斗鱼的 RTMP 推流地址。开启了直播室之后可以获得推流码。注意,斗鱼的推流码是有时限的,取到推流码需要尽快使用以免过期。

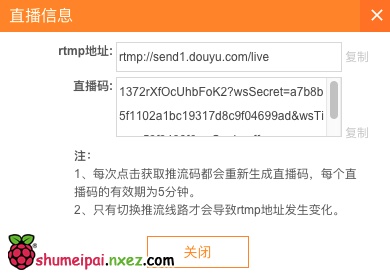
把这两个参数组合起来(中间加上/)。修改之后的命令例如:
gst-launch-1.0 -v v4l2src device=/dev/video0 ! 'video/x-raw, width=1024, height=768, framerate=30/1' ! queue ! videoconvert ! omxh264enc ! h264parse ! flvmux ! rtmpsink location='rtmp://send1.douyu.com/live/1372rSOMdcBJ8UHD?wsSecret=96d2k4ecdf267d17b8e8c38b6a4a6efd&wsTime=59f92e2e&wsSeek=off live=1'
然后就可以开播了。

打个小广告,欢迎大家关注我的斗鱼直播间~
https://www.douyu.com/1372
这里不定期直播宠物鱼。
应用以上技术实现的远程喂鱼项目:
http://make.quwj.com/program/nature-aquarium

总体上三种播放方式都有一定延迟,其中网页 Strobe Media Playback 播放延迟最小,大概在1秒左右。VLC 延迟比较固定默认约20秒,个别平台的版本是可以设置延迟数值的笔者没有亲力尝试。然后是斗鱼平台,斗鱼随着播放时间变长延迟也越来越长,需要刷新直播间页面才会同步。
搭建过程有问题请在树莓派实验室原文下面留言,转载请保证文章内容完整、注明出处并附带原文链接~

可以用来播放硬盘上的文件吗
可以的,通过添加 GStreamer 运行参数可以做到。具体用法需要查一下文档。
哇塞,我要模仿一个直播仓鼠的,哈哈哈
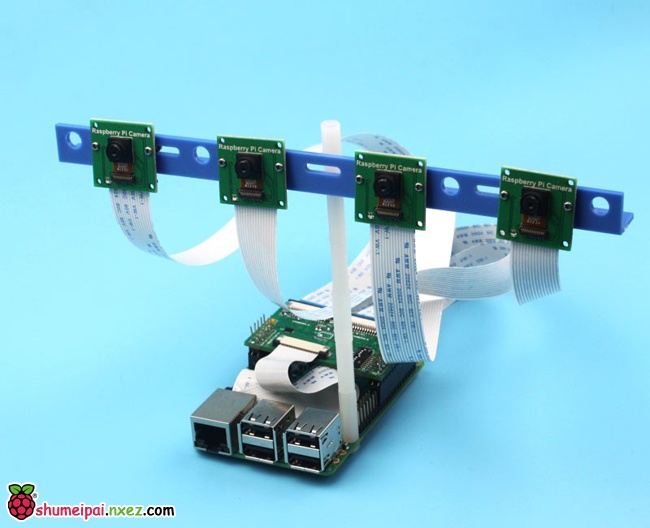
文章开头部分的一个树莓派带四个摄像头的图片很吸引我,因为我就有这样的需求,搜索了一下图片这东西好像叫 Multi camera Adapter module,在http://www.robotshop.com/en/arducam-multi-camera-adapter-module-raspberry-pi.html网站上有卖的,但价格挺贵的,还只兼容它自己的摄像头,这就没有办法了。
运行这个指令gst-launch-1.0 -v v4l2src device=/dev/video0 ! ‘video/x-raw, width=1024, height=768, framerate=30/1′ ! queue ! videoconvert ! omxh264enc ! h264parse ! flvmux ! rtmpsink location=’rtmp://树莓派的IP地址/live live=1’ &
显示erro pipeline does’t want to pause
摄像机等也不亮是怎么回事- –
有可能是已经在推流还未停止。多运行几次这个命令看看。
pi@raspberrypi:~ $ /etc/nginx/nginx.conf
/etc/nginx/nginx.conf: line 3: worker_processes: command not found
/etc/nginx/nginx.conf: line 12: events: command not found
/etc/nginx/nginx.conf: line 13: worker_connections: command not found
/etc/nginx/nginx.conf: line 14: syntax error near unexpected token `}’
/etc/nginx/nginx.conf: line 14: `}’
为什么会这样,再怎么解决
编辑这个文件需要用 sudo nano /etc/nginx/nginx.conf
为什么打开网页显示没有联网
出现错误
[tcp @ 0x164bf40] Connection to tcp://localhost:1935 failed (Connection refused), trying next address
[tcp @ 0x164bf40] Connection to tcp://localhost:1935 failed: Connection refused
[rtmp @ 0x164ba50] Cannot open connection tcp://localhost:1935
rtmp://localhost:1935/live: Connection refused
ERROR: from element /GstPipeline:pipeline0/GstRTMPSink:rtmpsink0: Could not open resource for writing.
Additional debug info:
gstrtmpsink.c(245): gst_rtmp_sink_render (): /GstPipeline:pipeline0/GstRTMPSink:rtmpsink0:
Could not connect to RTMP stream “rtmp://192.168.0.104/live live=1” for writing
Execution ended after 0:00:00.743897632
Setting pipeline to PAUSED …
Setting pipeline to READY …
Setting pipeline to NULL …
Freeing pipeline …
我也是这个问题,大佬请问你解决了吗?
楼主,我是按照你的方法安装的,确认一下:make之后,/etc/nginx/nginx.conf文件是空的么?我这边是空的,有点懵逼
不应该是空的。安装的时候可能会有错误信息。
http://树莓派的IP地址/index.html 没有显示
楼主你好,按照你的方法完成之后,就是网页播放的时候显示we are unable to the network.we apologize for the inconvenience.
您好。
在安装编译用的模块这一步显示
pi@raspberrypi:~ $ sudo apt-get install -y curl build-essential libpcre3 libpcre3-dev libpcre++-dev zlib1g-dev libcurl4-openssl-dev libssl-dev
Reading package lists… Done
Building dependency tree
Reading state information… Done
curl is already the newest version (7.52.1-5+deb9u2).
build-essential is already the newest version (12.3).
libpcre3 is already the newest version (2:8.39-3).
zlib1g-dev is already the newest version (1:1.2.8.dfsg-5).
zlib1g-dev set to manually installed.
Some packages could not be installed. This may mean that you have
requested an impossible situation or if you are using the unstable
distribution that some required packages have not yet been created
or been moved out of Incoming.
The following information may help to resolve the situation:
The following packages have unmet dependencies:
libcurl4-openssl-dev : Depends: libcurl3 (= 7.38.0-4+deb8u8) but 7.52.1-5+deb9u2 is to be installed
libpcre3-dev : Depends: libpcre3 (= 2:8.35-3.3+deb8u4) but 2:8.39-3 is to be installed
E: Unable to correct problems, you have held broken packages.
有些编译的他出错是怎么回事。。。麻烦赐教
libcurl 库的版本冲突,可能需要卸载一个版本以保持统一。
你好,这个摄像头会自己对焦吗?我拍摄迟来的东西为什么很模糊
我连接c270摄像头本身自带麦克风,如何加入音频一起推流?
请教命令是什么?目前
gst-launch-1.0 -v v4l2src ! ‘video/x-raw, width=1280, height=720, framerate=30/1′ ! queue ! videoconvert ! omxh264enc ! h264parse ! flvmux ! rtmpsink location=’rtmp://ip/live/camera live=1’
命令输入后 只有视频没有音频。
楼主,你好,我按照教程做到make的时候显示make: *** No rule to make target ‘build’, needed by ‘default’. Stop.这要怎么办呢
推流后斗鱼没有反应
请问楼主,可以做我现有网络摄像头的转发和观看吗?
运行这个指令gst-launch-1.0 -v v4l2src device=/dev/video0 ! ‘video/x-raw, width=1024, height=768, framerate=30/1′ ! queue ! videoconvert ! omxh264enc ! h264parse ! flvmux ! rtmpsink location=’rtmp://树莓派的IP地址/live live=1’
出现(gst-launch-1.0:11232): GStreamer-CRITICAL **: gst_element_make_from_uri: assertion ‘gst_uri_is_valid (uri)’ failed
WARNING: erroneous pipeline: syntax error
是因为缺失安装包么?
您好楼主
我也是这种情况,该怎么解决呢?
Execution ended after 0:00:00.722507499
Setting pipeline to PAUSED …
Setting pipeline to READY …
Setting pipeline to NULL …
Freeing pipeline …
麻烦了
楼主,按照您的方法重新试了好多次,其他问题都解决了,就是最后播放页面出现we are unable to the network.we apologize for the inconvenience.无法显示画面,这是网络的问题还是端口问题,请给点提示。
pi@raspberrypi:~ $ avconv -f video4linux2 -r 24 -i /dev/video0 -f flv rtmp://localhost:1935/live
ffmpeg version 3.2.10-1~deb9u1+rpt1 Copyright (c) 2000-2018 the FFmpeg developers
built with gcc 6.3.0 (Raspbian 6.3.0-18+rpi1) 20170516
configuration: –prefix=/usr –extra-version=’1~deb9u1+rpt1′ –toolchain=hardened –libdir=/usr/lib/arm-linux-gnueabihf –incdir=/usr/include/arm-linux-gnueabihf –enable-gpl –disable-stripping –enable-avresample –enable-avisynth –enable-gnutls –enable-ladspa –enable-libass –enable-libbluray –enable-libbs2b –enable-libcaca –enable-libcdio –enable-libebur128 –enable-libflite –enable-libfontconfig –enable-libfreetype –enable-libfribidi –enable-libgme –enable-libgsm –enable-libmp3lame –enable-libopenjpeg –enable-libopenmpt –enable-libopus –enable-libpulse –enable-librubberband –enable-libshine –enable-libsnappy –enable-libsoxr –enable-libspeex –enable-libssh –enable-libtheora –enable-libtwolame –enable-libvorbis –enable-libvpx –enable-libwavpack –enable-libwebp –enable-libx265 –enable-libxvid –enable-libzmq –enable-libzvbi –enable-omx-rpi –enable-mmal –enable-openal –enable-opengl –enable-sdl2 –enable-libdc1394 –enable-libiec61883 –enable-chromaprint –enable-frei0r –enable-libopencv –enable-libx264 –enable-shared
libavutil 55. 34.101 / 55. 34.101
libavcodec 57. 64.101 / 57. 64.101
libavformat 57. 56.101 / 57. 56.101
libavdevice 57. 1.100 / 57. 1.100
libavfilter 6. 65.100 / 6. 65.100
libavresample 3. 1. 0 / 3. 1. 0
libswscale 4. 2.100 / 4. 2.100
libswresample 2. 3.100 / 2. 3.100
libpostproc 54. 1.100 / 54. 1.100
[video4linux2,v4l2 @ 0x1456180] Cannot open video device /dev/video0: No such file or directory
/dev/video0: No such file or directory
如果推流正常,nginx开启正常,但是网页显示we are unable to the network.we apologize for the inconvenience.说明nginx配置文件里需要在http server中加入如下语句location /stat {
rtmp_stat all;
rtmp_stat_stylesheet stat.xsl;
}
location /stat.xsl {
# you can move stat.xsl to a different location
root /usr/build/nginx-rtmp-module;
}
# rtmp control
location /control {
rtmp_control all;
}
并重启nginx(我没用第一步安装和删除所以无法使用sudo service nginx start,我是使用sudo /usr/sbin/nginx –s stop 关闭;sudo /usr/sbin/nginx 开启;按照路径关闭和开启)原因是在网页服务界面没有加入rtmp播放控件,自己瞎琢磨好久才整好,希望对大家有帮助。
你好,请问怎么算推流正常呢,开启推流后控制台刷新了一些数据但是就阻塞了,这算正常吗?
而且我按照你的方法修改了conf文件,依然是提示we are unable to the network.we apologize for the inconvenience。
请问是怎么回事呢,我看你有一句root /usr/build/nginx-rtmp-module;这句是不是需要修改路径的?
谢谢!
怎么可以加强声音
你好,请问怎么算推流正常呢,开启推流后控制台刷新了一些数据但是就阻塞了,这算正常吗?
而且我按照你的方法修改了conf文件,依然是提示we are unable to the network.we apologize for the inconvenience。
请问是怎么回事呢,我看你有一句root /usr/build/nginx-rtmp-module;这句是不是需要修改路径的?
谢谢!
推流的时候:
错误:来自组件 /GstPipeline:pipeline0/GstRTMPSink:rtmpsink0:无法打开资源写入。
额外的调试信息:
gstrtmpsink.c(245): gst_rtmp_sink_render (): /GstPipeline:pipeline0/GstRTMPSink:rtmpsink0:
Could not connect to RTMP stream “rtmp://localhost/rtmp/live live=1” for writing
Execution ended after 0:00:00.672116801
设置暂停管道 …
设置备用管道 …
设置 NULL 管道 …
释放管道资源 …
这是什么问题,望解答,谢谢!
大佬您解决了吗?我也是这个问题,
您要是看到麻烦加个联系方式Q1172267343
风格同行热同行
你好,一切都配置完了用浏览器打开的时候,显示 We are unable to connect to the network. We apologize for the inconvenience.
受益匪浅
楼主你好!
我推流到一个Windows的Ngix-rtmp云服务器上树莓派会发至命错误,请教一下是什么原因造成的呢?端口已开放,但在本局域网里推流一切正常.
gst-launch-1.0 -v v4l2src device=/dev/video0 ! ‘video/x-raw, width=640, height=480, framerate=20/1′ ! queue ! videoconvert ! omxh264enc ! h26 4parse ! flvmux ! rtmpsink location=’rtmp://ip/live live=1’
Setting pipeline to PAUSED …
Pipeline is live and does not need PREROLL …
Setting pipeline to PLAYING …
New clock: GstSystemClock
/GstPipeline:pipeline0/GstV4l2Src:v4l2src0.GstPad:src: caps = video/x-raw, width =(int)640, height=(int)480, framerate=(fraction)20/1, format=(string)I420, pixel -aspect-ratio=(fraction)1/1, interlace-mode=(string)progressive, colorimetry=(st ring)bt601
/GstPipeline:pipeline0/GstCapsFilter:capsfilter0.GstPad:src: caps = video/x-raw, width=(int)640, height=(int)480, framerate=(fraction)20/1, format=(string)I420, pixel-aspect-ratio=(fraction)1/1, interlace-mode=(string)progressive, colorimet ry=(string)bt601
/GstPipeline:pipeline0/GstQueue:queue0.GstPad:src: caps = video/x-raw, width=(in t)640, height=(int)480, framerate=(fraction)20/1, format=(string)I420, pixel-asp ect-ratio=(fraction)1/1, interlace-mode=(string)progressive, colorimetry=(string )bt601
/GstPipeline:pipeline0/GstQueue:queue0.GstPad:sink: caps = video/x-raw, width=(i nt)640, height=(int)480, framerate=(fraction)20/1, format=(string)I420, pixel-as pect-ratio=(fraction)1/1, interlace-mode=(string)progressive, colorimetry=(strin g)bt601
/GstPipeline:pipeline0/GstCapsFilter:capsfilter0.GstPad:sink: caps = video/x-raw , width=(int)640, height=(int)480, framerate=(fraction)20/1, format=(string)I420 , pixel-aspect-ratio=(fraction)1/1, interlace-mode=(string)progressive, colorime try=(string)bt601
/GstPipeline:pipeline0/GstVideoConvert:videoconvert0.GstPad:src: caps = video/x- raw, width=(int)640, height=(int)480, framerate=(fraction)20/1, format=(string)I 420, pixel-aspect-ratio=(fraction)1/1, interlace-mode=(string)progressive, color imetry=(string)bt601
/GstPipeline:pipeline0/GstOMXH264Enc-omxh264enc:omxh264enc-omxh264enc0.GstPad:si nk: caps = video/x-raw, width=(int)640, height=(int)480, framerate=(fraction)20/ 1, format=(string)I420, pixel-aspect-ratio=(fraction)1/1, interlace-mode=(string )progressive, colorimetry=(string)bt601
/GstPipeline:pipeline0/GstVideoConvert:videoconvert0.GstPad:sink: caps = video/x -raw, width=(int)640, height=(int)480, framerate=(fraction)20/1, format=(string) I420, pixel-aspect-ratio=(fraction)1/1, interlace-mode=(string)progressive, colo rimetry=(string)bt601
/GstPipeline:pipeline0/GstOMXH264Enc-omxh264enc:omxh264enc-omxh264enc0.GstPad:sr c: caps = video/x-h264, stream-format=(string)byte-stream, alignment=(string)au, profile=(string)high, level=(string)4, width=(int)640, height=(int)480, pixel-a spect-ratio=(fraction)1/1, framerate=(fraction)20/1
/GstPipeline:pipeline0/GstH264Parse:h264parse0.GstPad:sink: caps = video/x-h264, stream-format=(string)byte-stream, alignment=(string)au, profile=(string)high, level=(string)4, width=(int)640, height=(int)480, pixel-aspect-ratio=(fraction)1 /1, framerate=(fraction)20/1
/GstPipeline:pipeline0/GstH264Parse:h264parse0.GstPad:src: caps = video/x-h264, stream-format=(string)avc, alignment=(string)au, profile=(string)high, level=(st ring)4, width=(int)640, height=(int)480, pixel-aspect-ratio=(fraction)1/1, frame rate=(fraction)20/1, parsed=(boolean)true, codec_data=(buffer)01640028ffe1000f27 640028ac2b40501ed8080f1226a001000528ee025cb0
/GstPipeline:pipeline0/GstFlvMux:flvmux0.GstPad:video: caps = video/x-h264, stre am-format=(string)avc, alignment=(string)au, profile=(string)high, level=(string )4, width=(int)640, height=(int)480, pixel-aspect-ratio=(fraction)1/1, framerate =(fraction)20/1, parsed=(boolean)true, codec_data=(buffer)01640028ffe1000f276400 28ac2b40501ed8080f1226a001000528ee025cb0
/GstPipeline:pipeline0/GstFlvMux:flvmux0: streamable = true
/GstPipeline:pipeline0/GstFlvMux:flvmux0.GstPad:src: caps = video/x-flv, streamh eader=(buffer)
/GstPipeline:pipeline0/GstRTMPSink:rtmpsink0.GstPad:sink: caps = video/x-flv, st reamheader=(buffer)
Message from syslogd@raspberrypi at Dec 19 07:01:22 …
kernel:[ 337.161418] Internal error: Oops: 17 [#1] SMP ARM
Message from syslogd@raspberrypi at Dec 19 07:01:22 …
kernel:[ 337.161694] Process v4l2src0:src (pid: 1224, stack limit = 0xa4956210 )
Message from syslogd@raspberrypi at Dec 19 07:01:22 …
kernel:[ 337.161705] Stack: (0xa4957d00 to 0xa4958000)
Message from syslogd@raspberrypi at Dec 19 07:01:22 …
kernel:[ 337.161723] 7d00: a4957d5c a4957d10 00000001 00000002 00000003 000000 01 00000000 b52dcc40
Message from syslogd@raspberrypi at Dec 19 07:01:22 …
kernel:[ 337.161740] 7d20: b50b2d04 b50b2d0c 00000001 7f0f92f8 00000000 b2e0cb 40 a4957d7c a4957d48
Message from syslogd@raspberrypi at Dec 19 07:01:22 …
kernel:[ 337.161757] 7d40: 7f0dc28c 7f0dba64 b52dcd5c b52dcd3c 00000001 000000 03 7f0e7184 b50b2d00
Message from syslogd@raspberrypi at Dec 19 07:01:22 …
kernel:[ 337.161774] 7d60: b52dc858 b2e0cb40 7f0fea2c 7f0bd59c a4957d9c a4957d 80 7f0e64d8 7f0dc1e4
Message from syslogd@raspberrypi at Dec 19 07:01:22 …
kernel:[ 337.161791] 7d80: 7f0e6444 b50b2d00 b2e0cb40 a49a64c0 a4957dbc a4957d a0 7f0a90c8 7f0e6450
Message from syslogd@raspberrypi at Dec 19 07:01:22 …
kernel:[ 337.161808] 7da0: 00000003 c0f8565c b52dc858 0000005c a4957e24 a4957d c0 7f0a7e68 7f0a9074
Message from syslogd@raspberrypi at Dec 19 07:01:22 …
kernel:[ 337.161824] 7dc0: a4956000 8032db88 7f0fea2c 00000170 00000000 7f0bdd 28 b50b2d00 a49a64c0
Message from syslogd@raspberrypi at Dec 19 07:01:22 …
kernel:[ 337.161841] 7de0: 00000000 a492d000 a492d7f8 c0f8565c 000000f8 b50b2d 00 b50b2d00 c0f8565c
Message from syslogd@raspberrypi at Dec 19 07:01:22 …
kernel:[ 337.161858] 7e00: 000000f8 b50b2d00 b50b2d00 00000003 7f0a7bc8 b2e0cb 40 a4957ee4 a4957e28
Message from syslogd@raspberrypi at Dec 19 07:01:22 …
kernel:[ 337.161875] 7e20: 7f0a7720 7f0a7bd4 00000000 00000000 000000f8 71bfe7 c4 00000018 00000001
Message from syslogd@raspberrypi at Dec 19 07:01:22 …
kernel:[ 337.161891] 7e40: 00070800 00002005 00000000 00000151 000187f7 000000 00 00000000 00000000
Message from syslogd@raspberrypi at Dec 19 07:01:22 …
kernel:[ 337.161908] 7e60: 00000000 00000000 00000001 00a98000 00070800 000000 00 00000000 7120a000
Message from syslogd@raspberrypi at Dec 19 07:01:22 …
kernel:[ 337.161925] 7e80: b49b7500 00000138 b2e0cb40 00000000 00000001 7120a1 38 7120a138 8000fd28
Message from syslogd@raspberrypi at Dec 19 07:01:22 …
kernel:[ 337.161941] 7ea0: 00000001 00000000 a4957f4c a4957eb8 80098780 800968 c8 00000000 b52dc858
Message from syslogd@raspberrypi at Dec 19 07:01:22 …
kernel:[ 337.161958] 7ec0: b2e0cb40 71bfe7c4 c0f8565c b52dcac0 a4956000 000000 00 a4957ef4 a4957ee8
Message from syslogd@raspberrypi at Dec 19 07:01:22 …
kernel:[ 337.161975] 7ee0: 7f0a7bc4 7f0a75a4 a4957f1c a4957ef8 7f0a2720 7f0a7b b0 7f0a264c b50a7720
Message from syslogd@raspberrypi at Dec 19 07:01:22 …
kernel:[ 337.161992] 7f00: 71bfe7c4 b2e0cb40 c0f8565c 00000008 a4957f7c a4957f 20 80169f80 7f0a2658
Message from syslogd@raspberrypi at Dec 19 07:01:22 …
kernel:[ 337.162009] 7f20: a4957f74 8016c494 00000001 00000081 7120a138 801750 08 a48bec00 7657c000
Message from syslogd@raspberrypi at Dec 19 07:01:22 …
kernel:[ 337.162026] 7f40: 71bfe7c4 76567d4c c0f8565c 00000008 a4957f6c a4957f 60 b2e0cb41 71bfe7c4
Message from syslogd@raspberrypi at Dec 19 07:01:22 …
kernel:[ 337.162043] 7f60: b2e0cb40 c0f8565c 00000008 a4956000 a4957fa4 a4957f 80 8016a1b4 80169b68
Message from syslogd@raspberrypi at Dec 19 07:01:22 …
kernel:[ 337.162059] 7f80: 00000000 7657c000 00000001 76567d4c 00000036 8000fd 28 00000000 a4957fa8
Message from syslogd@raspberrypi at Dec 19 07:01:22 …
kernel:[ 337.162076] 7fa0: 8000fb60 8016a17c 7657c000 00000001 00000008 c0f856 5c 71bfe7c4 00000000
Message from syslogd@raspberrypi at Dec 19 07:01:22 …
kernel:[ 337.162093] 7fc0: 7657c000 00000001 76567d4c 00000036 7657c000 000000 01 76c1f940 76567d4c
Message from syslogd@raspberrypi at Dec 19 07:01:22 …
kernel:[ 337.162110] 7fe0: 71bfe3c8 71bfe3b8 76f78c10 76c1f960 80000010 000000 08 00000000 00000000
Message from syslogd@raspberrypi at Dec 19 07:01:22 …
kernel:[ 337.162565] Code: e0854104 e5b43004 e3530000 0a00000a (e593e010)
请教一下,如何设置旋转摄像头内容?
错误:来自组件 /GstPipeline:pipeline0/GstRTMPSink:rtmpsink0:无法打开资源写入。
额外的调试信息:
gstrtmpsink.c(245): gst_rtmp_sink_render (): /GstPipeline:pipeline0/GstRTMPSink:rtmpsink0:
Could not connect to RTMP stream “rtmp://192.168.3.35/live live=1” for writing
Execution ended after 0:00:00.731643183
请问这个问题怎么解决
想请教一下, 大佬有解决问题嘛, 我也这个错误