前情提要
最近突然看到这篇教程,就想玩homeassistant,又不想重装系统,于是就找ha中文网看文档。
发现只要执行一句 sudo pip3 install homeassistant 就可以装,炒鸡开心呐~马上开工!然鹅,我还是太天真了。
环境:raspbian 2018-11-13(debian9)
这是为不想重装系统的同学们写的,如果不想
折腾可以**直接使用这篇教程的镜像安装**
pip 源之坑
安装HA需要正确食用pip。
错误示范
文档里面建议换国内源,于是我照做了。
Linux:~/.pip/pip.conf(~/是用户的根目录,一般是“/home/你的Linux账号名”;如果是采用sudo pip install ……命令,配置文件一般会位于/root/.pip/pip.conf。比如下面例子中配置文件位于/home/sam/.pip/pip.conf)
然后我试了一下加上这个后:
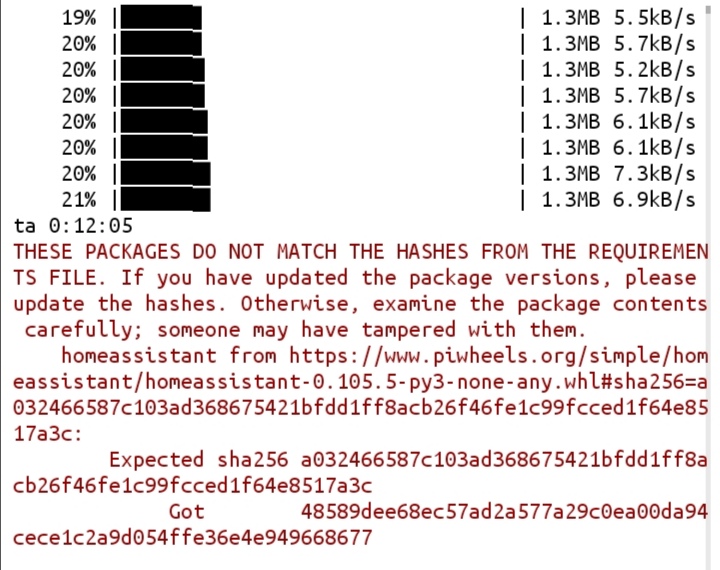
THESE PACKAGES DO NOT MATCH THE
HASHES FROM THE REQUIREMEN
TS FILE. If you have updated the
package versions, please
update the hashes. Otherwise,
examine the package contents
carefully; someone may have
tampered with them.
意思是 sha256 不匹配!
网上让我重试几次,鬼知道我试了几个小时。。。。
经过上面一顿操作,下载速度还是 5kb/s,而且还超时、错误。。。我注意到 pip 下载的源还是 piwheel 源,当然说明这堆操作毫无用处。
换源正确姿势
最终,我在一篇blog看到:树莓派的pip源应该在`/etc/pip.conf`
我一看:果然里面赫然写着:
[global]
extra-index-url=https://www.piwheels.org/simple
哦豁!
然后我把网址改成`https://mirrors.aliyun.com/pypi/simple`
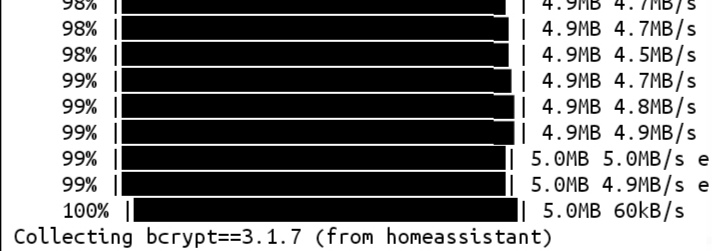
然后pip执行,速度嗖嗖的,基本上在5m/s,很顺利地完成了下载。
非常的 amazing 啊。
编译安装之坑
按上述步骤完成下载后很可能会卡在buliding wheels。如果卡某个库时间过长,干脆按下ctrl-c开始下一个库的安装吧。待到最后全部安装完,再尝试执行一遍`sudo pip3 install homeassistant`
不过据我的经验,仅仅这样子还是不行滴。
由于默认源piwheels.org有用于树莓派的armv7的whl文件,因此无需编译。但是换源后就不同了,由于大多数库没有armv7的whl,所以必须自行安装。这里就有一个大坑:buliding wheel总是会报错:
#include^ compilation terminated. error: command 'arm-linux-gnueabihf-gcc' failed with exi t status 1 ---------------------------------------- ERROR: Failed building wheel for cryptography Failed to build cryptography ERROR: Could not build wheels for cryptography which use P EP 517 and cannot be installed directly
网上解决方法一般是安装pep517或者想办法安装gcc-arm-linux-gnueabihf。然并卵。
假如安装pep517,还是同样报错;如果安装arm-linux-gnueabihf-gcc之类的东西,就会有各种各样的错误,比如这样:
E: Unable to correct problems, you have held broken packages.
最后发现,问题不在这里,只需要安装两个库:
sudo apt-get install libffi-dev libssl-dev
然后,终端终于输出了久违的 successfully。
最后一公里
最后当然是运行啦。hass
我没遇到什么坑,感动中国。
这个阶段,hass 会自动找到需要的东西并自动 pip,当然也有失败的时候。不过这时候只要等一段时间就可以了。如果你没耐心,可以按下 ctrl-c 并运行 hass –skip-pip 来跳过安装那些库。不过这样可能会使得一些功能不可用。
Enjoy!
国内有很多关于ha教程,树莓派实验室也有很多可以参考。在经过一定了解后,这里有一份可用的实体列表可以参考,内容还是很全面的。

不错不错 都是我曾经跌进的坑
收获
收获不小,少走了不少弯路,再次感谢。
牛逼!!所有问题我都遇到了!
[global]
index-url=https://mirrors.aliyun.com/pypi/simple
全部都安装成功,但是最后hass的出现下面这样的错误,不知道楼主是否知道怎么处理,每一步都成功的。。。。这可怎么办
ERROR (MainThread) [homeassistant.auth.providers] Unable to load auth provider homeassistant: libffi.so.7: cannot open shared object file: No such file or directory
2022-01-03 00:40:54 ERROR (MainThread) [homeassistant.bootstrap] Home Assistant core failed to initialize. Further initialization aborted
2022-01-03 00:40:54 WARNING (MainThread) [homeassistant.bootstrap] Unable to set up core integrations. Activating safe mode
2022-01-03 00:40:54 ERROR (MainThread) [homeassistant.auth.providers] Unable to load auth provider homeassistant: libffi.so.7: cannot open shared object file: No such file or directory
2022-01-03 00:40:54 ERROR (MainThread) [homeassistant.bootstrap] Home Assistant core failed to initialize. Further initialization aborted