作者:mc_six
我们是通讯行业动力维护专业,因为外市电(三相交流电)的波动会对我们的设备造成一定的影响。于是想做一个交流电监测的应用,监测交流电的过压或欠压,所以我做了这么一个实时监测的工具。它可以在过压和欠压一定程度的时候告警。或者进行长期监测并记录电压数据,分析可能发生过压或欠压的原因。
树莓派作为一个简单易用功能强大的计算平台,很好地支持 Python。而且刚好有 MCC 118 数据采集模块(HAT)可以直接扩展出数据采集功能,MCC 118 提供 8 通道模拟电压输入,基于树莓派的数据采集/数据记录系统。每张 MCC 118 最大采样率为 100kS/s,可以进行单电压点和电压波形采集。

项目的代码就是在 MCC DAQ HATs 提供的 SDK 示例代码中,continuous_scan.py 的基础上修改来的。实现一个高速的采集及告警设备,来监测外市电的波动情况。
长期监测主要通过长期数据记录,分析是否有未超出告警范围的波动,以分析供电质量。
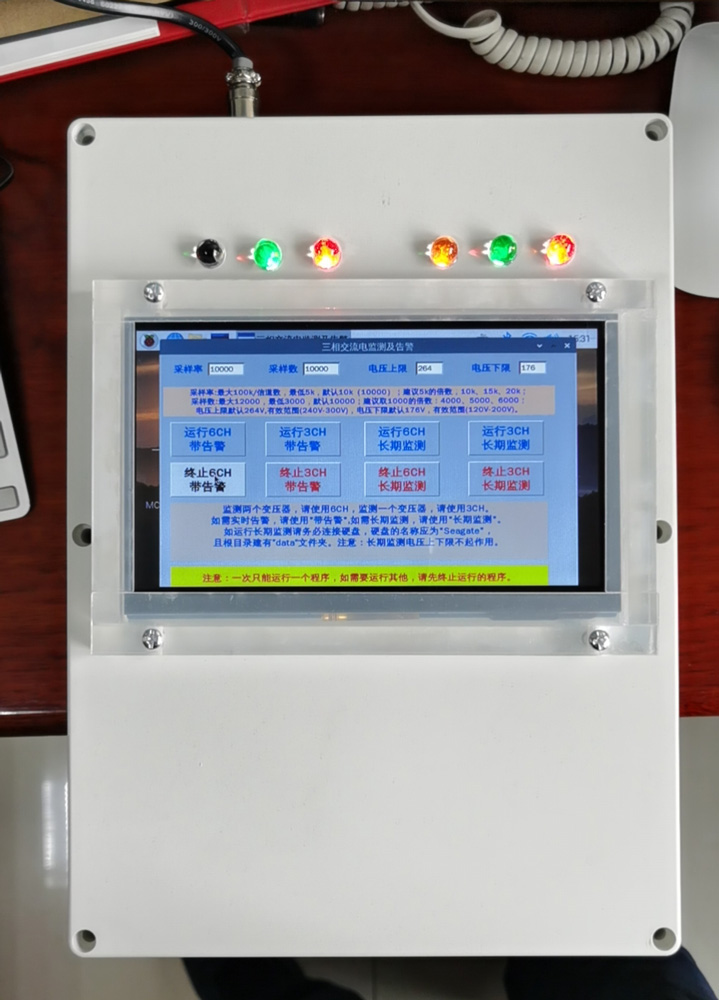
这只是一个工程样机,可以进行实时(延时3秒+)告警和储存发生告警时的电压波形;可以进行长期监测(不实时告警)、也可以长期监测并实时告警。
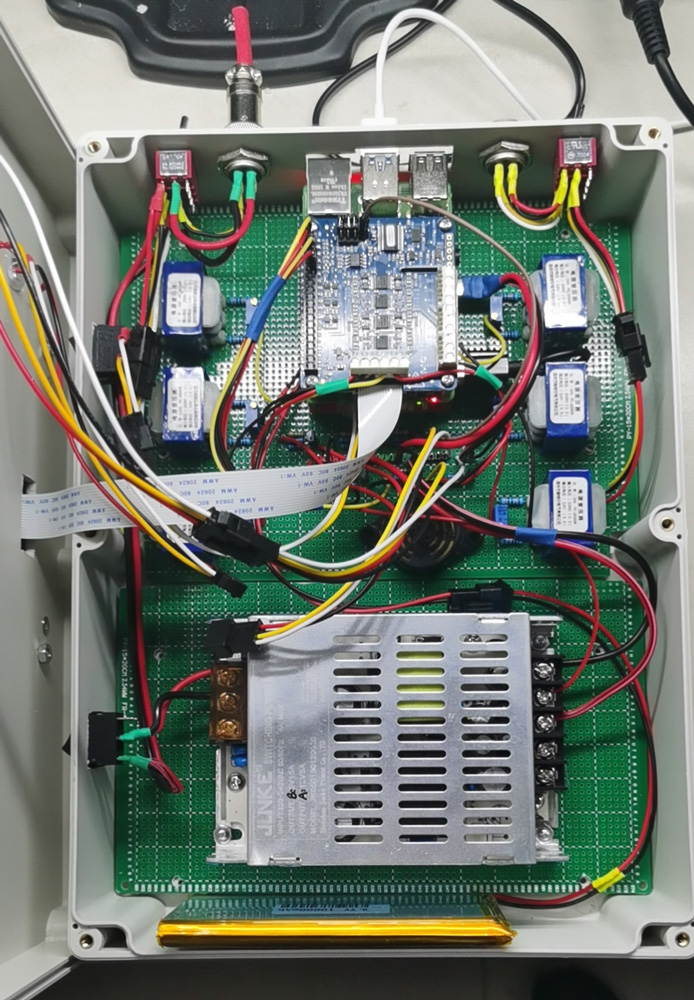
内部构造如下图,其中 MCC 118 在图中正上方。
告警分为4种:本机的光告警、本机的声告警、继电器输出的外部告警、物联网平台(OneNet)告警。
目前支持两路三相交流电监测,每路三相电的 A、B、C 相分别用。黄、绿、红,发光二极管告警。
物联网平台的告警页面。分别是:一路三相电的一相告警,以及一路三相电的三相告警。

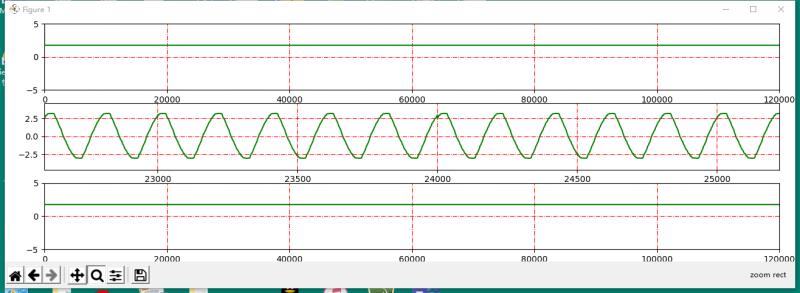
采集到的正常交流电波形如下图。
数据分析部分是用 NumPy 进行交流电每个周期的最大值、最小值判断,然后确定是否报警,是否写入硬盘。
还有一个程序每一做任何判断,把采集到的所有数据都直接记录到硬盘,大概一小时会生成 1.2G 的数据。
也是用 Python 写的脚本,通过 NumPy 把数据做一个转换 ,然后用 NumPy 的 amax 和 amin 对数值进行分析判断。如果数据超过阈值,就写硬盘文件,同时用 GPIO 输出控制 LED 来发出预警信号。
以下是完整代码,其中关键代码已经添加了注释。
#!/usr/bin/env python
#  -*- coding: utf-8 -*-

"""
    MCC 118 Functions Demonstrated:
        mcc118.a_in_scan_start
        mcc118.a_in_scan_read
        mcc118.a_in_scan_stop
        mcc118.a_in_scan_cleanup

    Purpose:
        Perform a continuous acquisition on 1 or more channels.

    Description:
        Continuously acquires blocks of analog input data for a
        user-specified group of channels until the acquisition is
        stopped by the user.  The last sample of data for each channel
        is displayed for each block of data received from the device.
        MCC118共8个通道,可以监测两个三相变压器的6路市电,分别为变压器1的A、B、C相和变压器2的A、B、C相
"""
from __future__ import print_function
from daqhats import mcc118, OptionFlags, HatIDs, HatError
from daqhats_utils import select_hat_device, enum_mask_to_string, \
    chan_list_to_mask
import os
import threading
import numpy as np
import datetime
import time
from socket import *
import RPi.GPIO as GPIO
# ===GPIO  setup=====================================================================
GPIO.setmode(GPIO.BCM)
led_list=[5,6,19,16,20,21]                          #LED使用的GPIO
GPIO.setup(led_list, GPIO.OUT, initial=GPIO.LOW)
delta = datetime.timedelta(minutes=5)
# ===================================================================================
READ_ALL_AVAILABLE = -1
CURSOR_BACK_2 = '\x1b[2D's
ERASE_TO_END_OF_LINE = '\x1b[0K'
# ===================================================================================
arraydata=[[0 for i in range(72000)] for h in range(10)]   #定义一个采样缓存数组,72000为read_request_size*信道数,10为#连续采样的次数c_time

# =======OneNet param===================================================================
device_id = "Your 设备ID"  # Your 设备ID
api_key = "Your API_KEY"  # Your API_KEY
HOST = 'api.heclouds.com'
PORT = 80
BUFSIZ = 1024
ADDR = (HOST, PORT)
# =======Channel set==================================================================
# Store the channels in a list and convert the list to a channel mask that
# can be passed as a parameter to the MCC 118 functions.
channels = [0, 1, 2, 3, 4, 5]
channel_mask = chan_list_to_mask(channels)
num_channels = len(channels)
samples_per_channel = 0
options = OptionFlags.CONTINUOUS
scan_rate = 10000.0                     #采样速率 最大值为100k/信道数
read_request_size = 12000               #每通道此次采样的点数
c_time = 10                             #连续采样的次数
timeout = 5.0
# =======上下限=================================================================
volt=220        #根据需要设定标准电压
thread=0.2      #根据需要设定
upline=volt*(1+thread)*1.414*0.013558       #0.013558是根据电阻分压确定的
downline=volt*(1-thread)*1.414*0.013558     #0.013558是根据电阻分压确定的
# =======LED监测=================================================================
base_time=datetime.datetime.now()
#定义时间临时数组
led_stime=[base_time,base_time,base_time,base_time,base_time,base_time]
#定义状态临时数组
led_status=[-1,-1,-1,-1,-1,-1]

#=====================================================================================
def led_detect():
    global led_stime,led_status
    #变压器的A、B、C相
    transno=["Trans1A","Trans1B","Trans1C","Trans2A","Trans2B","Trans2C"]
    try:
        #判断每个LED的状态
        while PORT > 0 :
            time.sleep(1)
            if GPIO.input(5) == GPIO.HIGH and led_status[0]<0 :
                led_stime[0]=datetime.datetime.now()
                led_status[0]=1

            if GPIO.input(6) == GPIO.HIGH and led_status[1]<0 :
                led_stime[1]=datetime.datetime.now()
                led_status[1]=1

            if GPIO.input(19) == GPIO.HIGH and led_status[2]<0 :
                led_stime[2]=datetime.datetime.now()
                led_status[2]=1

            if GPIO.input(16) == GPIO.HIGH and led_status[3]<0 :
                led_stime[3]=datetime.datetime.now()
                led_status[3]=1

            if GPIO.input(20) == GPIO.HIGH and led_status[4]<0 :
                led_stime[4]=datetime.datetime.now()
                led_status[4]=1

            if GPIO.input(21) == GPIO.HIGH and led_status[5]<0 :
                led_stime[5]=datetime.datetime.now()
                led_status[5]=1
            #相应引脚延时5分钟熄灭,并向平台发送数据清除告警
            for i in range(6):
                now=datetime.datetime.now()
                if now > ( led_stime[i] + delta ) and led_status[i]>=0 :
                    GPIO.output(led_list[i], GPIO.LOW)
                    led_status[i]=-1
                    t5 = threading.Thread(target=senddata, args=(transno[i],"0"))
                    t5.start()

    except KeyboardInterrupt:
    # Clear the '^C' from the display.
        print(CURSOR_BACK_2, ERASE_TO_END_OF_LINE, '\n')
        print('Stopping')

# ========senddata to OneNet==============================================================
def senddata(T_dev,alm):
    Content = ""
    Content += "{\"datastreams\":[{\"id\": \""+T_dev+"\",\"datapoints\": [{\"value\": " + alm + "}]}"
    Content += "]}\r\n"
    value = len(Content)
    data = ""
    data += "POST /devices/" + device_id + "/datapoints HTTP/1.1\r\n"
    data += "Host:api.heclouds.com\r\n"
    data += "Connection: close\r\n"
    data += "api-key:" + api_key + "\r\n"
    data += "Content-Length:" + str(value) + "\r\n"
    data += "\r\n"
    data += Content

    tcpCliSock = socket(AF_INET, SOCK_STREAM)
    tcpCliSock.connect(ADDR)
    tcpCliSock.send(data.encode())
    #data1 = tcpCliSock.recv(BUFSIZ).decode()
    #print(data1)
# =====writefile==========================================================================
def writefile(arrayatt, fnat):
    print("write     file    ", datetime.datetime.now())
    np.savetxt(fnat, arrayatt.T, fmt="%1.2f", delimiter=" ")
    print("\033[0;31m","finish   write    ", datetime.datetime.now(),"\033[0m")

#====Analyse and writefile and Alarm=======================================================
def analyse(array,fnat):
    break_1_1 = -1
    break_2_1 = -1
    break_1_2 = -1
    break_2_2 = -1
    break_1_3 = -1
    break_2_3 = -1
    break_1 = -1
    break_2 = -1
    print("analyse   file    ", datetime.datetime.now())
    #等于read_request_size = 12000
    lll = read_request_size
    file1 = "1-"+fnat
    file2 = "2-"+fnat
    a=np.array(array)
    b = np.empty([3, c_time*read_request_size], dtype=float)  # 变压器1定义一个数组
    c = np.empty([3, c_time*read_request_size], dtype=float)  # 变压器2定义一个数组
    #板子的数据记录格式是:CH0、CH1、CH2、CH3、CH4、CH5、CH0、CH1、CH2、CH3、CH4、CH5、CH0、CH1、CH2、CH3、CH4、CH5、CH0、CH1、CH2、CH3、CH4、CH5、CH0、CH1、CH2、CH3、CH4、CH5、
    #通过下面拆分成6个CH每个CH一个list以便进行分CH判断
    b[0] = np.concatenate((a[0, 0::6], a[1, 0::6], a[2, 0::6], a[3, 0::6], a[4, 0::6], a[5, 0::6], a[6, 0::6],a[7, 0::6], a[8, 0::6], a[9, 0::6]))  #提取变压器1,A相数据
    b[1] = np.concatenate((a[0, 1::6], a[1, 1::6], a[2, 1::6], a[3, 1::6], a[4, 1::6], a[5, 1::6], a[6, 1::6],a[7, 1::6], a[8, 1::6], a[9, 1::6]))  #提取变压器1,B相数据
    b[2] = np.concatenate((a[0, 2::6], a[1, 2::6], a[2, 2::6], a[3, 2::6], a[4, 2::6], a[5, 2::6], a[6, 2::6],a[7, 2::6], a[8, 2::6], a[9, 2::6]))  #提取变压器1,C相数据
    c[0] = np.concatenate((a[0, 3::6], a[1, 3::6], a[2, 3::6], a[3, 3::6], a[4, 3::6], a[5, 3::6], a[6, 3::6],a[7, 3::6], a[8, 3::6], a[9, 3::6]))  #提取变压器2,A相数据
    c[1] = np.concatenate((a[0, 4::6], a[1, 4::6], a[2, 4::6], a[3, 4::6], a[4, 4::6], a[5, 4::6], a[6, 4::6],a[7, 4::6], a[8, 4::6], a[9, 4::6]))  #提取变压器2,B相数据
    c[2] = np.concatenate((a[0, 5::6], a[1, 5::6], a[2, 5::6], a[3, 5::6], a[4, 5::6], a[5, 5::6], a[6, 5::6],a[7, 5::6], a[8, 5::6], a[9, 5::6]))  #提取变压器2,C相数据
#=====判断越线=================================================================================
    # 200  是   scan_rate = 10000.0  除以  50(交流电的频率)得出 每个周期 采样200个点
    # 600 是 120000/200=600    read_request_size*c_time本次总的采样点数,除以每周期200点,总共600个周期
    # 如果  scan_rate = 5000.0 就是  100, alens 是 120000/100=1200

    for i in range(600):
        #每个CH拆分成每个正弦波周期进行峰值判断
        a1 = b[0][(i * 200):((i + 1) * 200 - 1)]
        b1 = b[1][(i * 200):((i + 1) * 200 - 1)]
        c1 = b[2][(i * 200):((i + 1) * 200 - 1)]
        a2 = c[0][(i * 200):((i + 1) * 200 - 1)]
        b2 = c[1][(i * 200):((i + 1) * 200 - 1)]
        c2 = c[2][(i * 200):((i + 1) * 200 - 1)]

        #每一项分别判断上下限并分别告警
        if np.amax(a1) > upline or np.amax(a1) < downline :
            if break_1_1 <0:
                GPIO.output(5, GPIO.HIGH)   #相应引脚置高电平,点亮LED
                break_1_1 = 1
                t3 = threading.Thread(target=senddata, args=("Trans1A","100"))  #调用上传进程
                t3.start()
        if np.amax(b1) > upline or np.amax(b1) < downline  :
            if break_1_2< 0:
                GPIO.output(6, GPIO.HIGH)   #相应引脚置高电平,点亮LED
                break_1_2 = 1
                t3 = threading.Thread(target=senddata, args=("Trans1B","100"))  #调用上传进程
                t3.start()
        if np.amax(c1) > upline or np.amax(c1) < downline:
            if  break_1_3 < 0:
                GPIO.output(19, GPIO.HIGH)   #相应引脚置高电平,点亮LED
                break_1_3 = 1
                t3 = threading.Thread(target=senddata, args=("Trans1C","100"))  #调用上传进程
                t3.start()
        if np.amax(a2) > upline or np.amax(a2) < downline:
            if break_2_1 < 0:
                GPIO.output(16, GPIO.HIGH)   #相应引脚置高电平,点亮LED
                break_2_1=1
                t3 = threading.Thread(target=senddata, args=("Trans2A","100"))  #调用上传进程
                t3.start()
        if np.amax(b2) > upline or np.amax(b2) < downline:
            if break_2_2 < 0:
                GPIO.output(20, GPIO.HIGH)   #相应引脚置高电平,点亮LED
                break_2_1 =1
                t3 = threading.Thread(target=senddata, args=("Trans2B","100"))  #调用上传进程
                t3.start()
        if np.amax(c2) > upline or np.amax(c2) < downline:
            if break_2_3 < 0:
                GPIO.output(21, GPIO.HIGH)   #相应引脚置高电平,点亮LED
                break_2_2 = 1
                t3 = threading.Thread(target=senddata, args=("Trans2C","100"))  #调用上传进程
                t3.start()
        #每个变压器任何一项有告警就调用写文件进程写文件
        if np.amax(a1) > upline or np.amax(a1) < downline or np.amax(b1) > upline or np.amax(b1) < downline or np.amax(c1) > upline or np.amax(c1) < downline:
            if break_1 < 0:
                t1 = threading.Thread(target=writefile, args=(b, file1,))  #调用写文件进程
                t1.start()
                break_1 =  2

        if np.amax(a2) > upline or np.amax(a2) < downline or np.amax(b2) > upline or np.amax(b2) < downline or np.amax(c2) > upline or np.amax(c2) < downline:
            if break_2 < 0:
                t1 = threading.Thread(target=writefile, args=(c, file2,))  #调用写文件进程
                t1.start()
                break_2 =  2
    print("\033[0;32m","analyse finish    ", datetime.datetime.now(),"\033[0m")    #font color
# ============================================================================================
def main():
    """
    This function is executed automatically when the module is run directly.
    """
# ============================================================================================
    try:

        # Select an MCC 118 HAT device to use.
        address = select_hat_device(HatIDs.MCC_118)
        hat = mcc118(address)
        '''
        print('\nSelected MCC 118 HAT device at address', address)
        actual_scan_rate = hat.a_in_scan_actual_rate(num_channels, scan_rate)
        print('\nMCC 118 continuous scan example')
        print('    Functions demonstrated:')
        print('         mcc118.a_in_scan_start')
        print('         mcc118.a_in_scan_read')
        print('         mcc118.a_in_scan_stop')
        print('    Channels: ', end='')
        print(', '.join([str(chan) for chan in channels]))
        print('    Requested scan rate: ', scan_rate)
        print('    Actual scan rate: ', actual_scan_rate)
        print('    Options: ', enum_mask_to_string(OptionFlags, options))
# ============================================================================================
        try:
            input('\nPress ENTER to continue ...')
        except (NameError, SyntaxError):
            pass
        '''
        # Configure and start the scan.
        # Since the continuous option is being used, the samples_per_channel
        # parameter is ignored if the value is less than the default internal
        # buffer size (10000 * num_channels in this case). If a larger internal
        # buffer size is desired, set the value of this parameter accordingly.
        print('Starting scan ... Press Ctrl-C to stop\n')
        hat.a_in_scan_start(channel_mask, samples_per_channel, scan_rate,options)
# ============================================================================================
        try:
            while True:
                fna = str(datetime.datetime.now()) + ".txt"
                #连续采样10次
                for i in range(c_time):
                    read_result = hat.a_in_scan_read(read_request_size, timeout)  # read channel Data
                    arraydata[i]=read_result.data

                    if read_result.hardware_overrun:
                        print('\n\nHardware overrun\n')
                        break
                    elif read_result.buffer_overrun:
                        print('\n\nBuffer overrun\n')
                        break

                    hat.a_in_scan_stop()
                    hat.a_in_scan_cleanup()
                    hat.a_in_scan_start(channel_mask, samples_per_channel, scan_rate,options)

                #调用分析进程
                arraydatat = arraydata
                t2 = threading.Thread(target=analyse, args=(arraydatat, fna, ))
                t2.start()

        except KeyboardInterrupt:
            # Clear the '^C' from the display.
            print(CURSOR_BACK_2, ERASE_TO_END_OF_LINE, '\n')
            print('Stopping')
            hat.a_in_scan_stop()
            hat.a_in_scan_cleanup()

    except (HatError, ValueError) as err:
        print('\n', err)


if __name__ == '__main__':
    #表用进程实时监测告警状态,判断是否到时间消除告警
    t4 = threading.Thread(target=led_detect)
    t4.start()
    main()
程序部署
参考这篇教程安装好 MCC DAQ HATs 的 SDK 和代码示例。
https://shumeipai.nxez.com/2018/10/18/get-started-with-the-evaluation-for-mcc-118.html
将上面的程序保存为 main.py 然后在程序所在目录运行下面的命令即可启动程序。
sudo python main.py
有任何问题欢迎访问趣小组交流:
https://talk.quwj.com/topic/916
获取更多关于Measurement Computing的信息,请访问官网:china.mccdaq.com


你好,树莓派的SD卡的存写速度大概有40MB/s,而ADC读取数据就100kS/s,请问在进行电压电流采样的时候,还需要设置buffer缓冲区嘛?
需要缓冲区,或者使用 /tmp 作为缓冲区
谢谢你这么快的回复,按理说SD卡存写的速度远远大于信号的读取速度,为什么还需要设置缓冲区呢?是出于什么原因呢?如何考虑的呢?
SD 卡读写速度不代表树莓派可以在任何时候以这个速度写入 SD 卡。这中间有 IO 执行效率的问题,比如多个写入指令的同步执行、OS 的 IO 调度等。本文作者在使用 SD 卡直接作为采集存储时就遇到了瓶颈,后面通过优化才将 MCC118 的性能发挥出来。
好的,明白了,谢谢大佬的解答
请问如果我做一个收集家里插座的采集装置该怎么改这个代码呢?我不需要监测功能,不需要LED这些告警啥的。
我设计一个信号调理电路将插座的电压和电流传入到MCC 118的两个通道中。
然后怎么修改这个代码实现数据采集的功能,需要存储在树莓派的SD卡中,并且需要存的是电压电流的有效值。我注意到这个代码收集的是交流值。
if GPIO.input(5) == GPIO.HIGH and led_status[0]<0 :
led_stime[0]=datetime.datetime.now()
led_status[0]=1
你好,怎么5脚设置成了input?