本文转自 https://mp.weixin.qq.com/s/rh9t7Wt7DVHL3P7xqwG3HQ,作者 Dmitrii Eliuseev。
目前,绝大多数大模型运行在云端服务器,终端设备通过调用api的方式获得回复。但这种方式有几个缺点:首先,云api要求设备始终在线,这对于部分需要在无互联网接入的情况运行的设备很不友好;其次,云api的调用需要消耗流量费,用户可能不想支付这部分费用;最后,如果几年后,项目组被关停,API接口被关闭,那么用户花大价钱购买的智能硬件将成为一块砖头。所以,我坚信,最终的用户硬件应该能够完全离线运行,无需额外成本或使用在线 API。(用户可以选择是否使用在线api,但离线服务是必需的)
在本文中,我将展示如何在 Raspberry Pi 上运行 LLaMA-2 GPT 模型和自动语音识别 (ASR)。这使得我们能够向 Raspberry Pi 提出问题并获得答案,所有这一切都将完全离线进行。
本文中提供的代码在 Raspberry Pi 上运行。但也适用于 Windows、OSX 或 Linux 笔记本电脑。因此,那些没有 Raspberry Pi 的读者可以轻松测试代码。
硬件
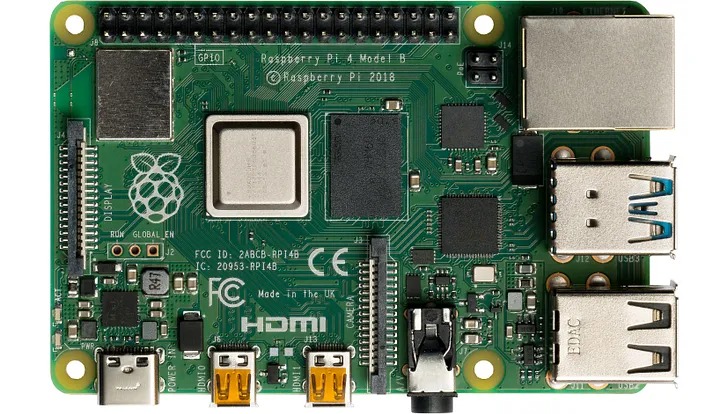
Raspberry Pi 4,它是一台运行Linux的单板计算机;它体积小,仅需要 5V 直流电源,无需风扇和主动冷却:
对于RAM大小,我们有两种选择:
- 有 8 GB RAM 的 Raspberry Pi 允许我们运行7B LLaMA-2 GPT[1]模型,其在 4 位量化模式下的内存占用约为 5 GB。
- 有2 或 4 GB RAM的设备允许我们运行像TinyLlama-1B[2]这样的较小模型。这个模型也更快,但正如我们稍后将看到的,它的答案可能有点不那么“聪明”。
这两种模型都可以从 HuggingFace 下载,一般来说,几乎不需要更改代码。
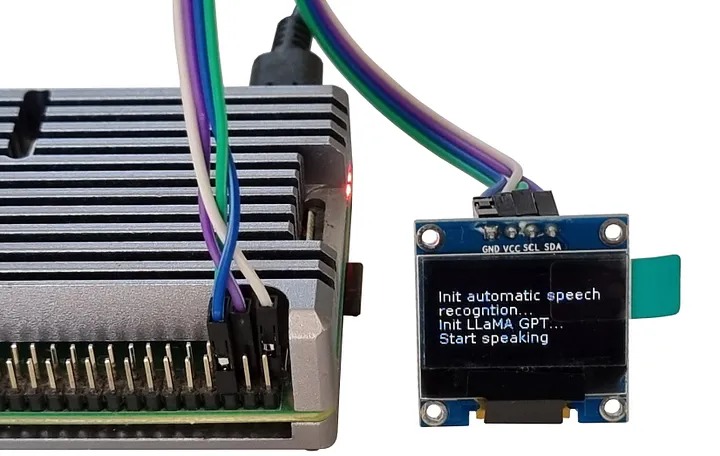
Raspberry Pi 是一台成熟的 Linux 计算机,我们可以通过 SSH 轻松地在终端中看到输出。但它不够有趣,也不适合像机器人这样的移动终端设备。对于 Raspberry Pi,我将使用单色128×64 I2C OLED 显示屏。该显示器仅需要 4 根线即可连接:
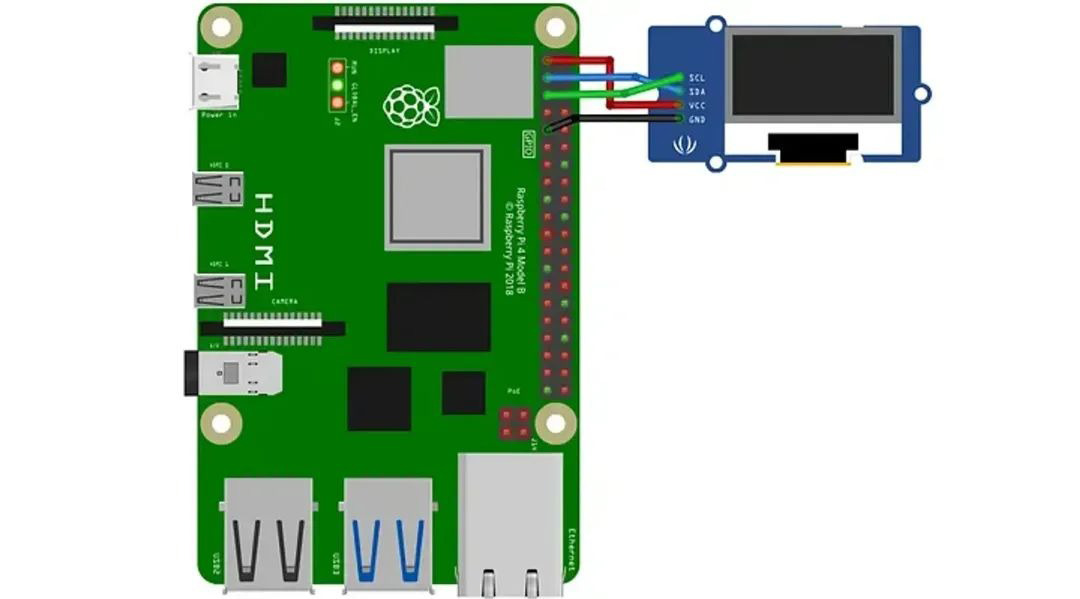
显示器可以在淘宝上以十几元的价格购买;无需焊接,在 Raspberry Pi 设置中启用 I2C 接口即可;关于这一点有足够的教程。为了简单起见,我将在这里省略硬件部分,只关注 Python 代码。
显示
我将从显示器开始,因为在测试过程中最好在屏幕上看到一些东西。Adafruit_CircuitPython_SSD1306库允许我们在 OLED 显示屏上显示任何图像。该库有一个低级接口;它只能从内存缓冲区中绘制像素或单色位图。为了使用可滚动文本,我创建了一个存储文本缓冲区的数组和一个_display_update绘制文本的方法:
from PIL import Image, ImageDraw, ImageFont
try:
    import board
    import adafruit_ssd1306
    i2c = board.I2C()
    oled = adafruit_ssd1306.SSD1306_I2C(pixels_size[0], pixels_size[1], i2c)
except ImportError:
    oled = None


char_h = 11
rpi_font_poath = "DejaVuSans.ttf"
font = ImageFont.truetype(rpi_font_poath, char_h)
pixels_size = (128, 64)
max_x, max_y = 22, 5
display_lines = [""]

def _display_update():
    """ Show lines on the screen """
    global oled
    image = Image.new("1", pixels_size)
    draw = ImageDraw.Draw(image)
    for y, line in enumerate(display_lines):
        draw.text((0, y*char_h), line, font=font, fill=255, align="left")

    if oled:
        oled.fill(0)
        oled.image(image)
        oled.show()
这里,一个(22, 5)变量包含我们可以显示的行数和列数。如果发生这种情况,变量oled也可以是 None ImportError;例如,如果我们在笔记本电脑而不是 Raspberry Pi 上运行此代码。为了模拟文本滚动,我还创建了两个辅助方法:
def add_display_line(text: str):
    """ Add new line with scrolling """
    global display_lines
    # Split line to chunks according to screen width
    text_chunks =  for i in range(0, len(text), max_x)]
    for text in text_chunks:
        for line in text.split("\n"):
            display_lines.append(line)
            display_lines = display_lines[-max_y:]
    _display_update()

def add_display_tokens(text: str):
    """ Add new tokens with or without extra line break """
    global display_lines
    last_line = display_lines.pop()
    new_line = last_line + text
    add_display_line(new_line)
第一种方法是在显示中添加新行;如果字符串太长,该方法会自动将其分成几行。第二种方法是添加不带“回车符”的文本标记;我将使用它来显示 GPT 模型的答案。调用add_display_line方法:
for p in range(20):
    add_display_line(f"{datetime.now().strftime('%H:%M:%S')}: Line-{p}")
    time.sleep(0.2)
如果一切运行正常,树莓派会重复打印当前时间:
自动语音识别(ASR)
对于 ASR,我将使用HuggingFace的Transformers[3]库,调用它,通过几行 Python 代码实现语音识别:
from transformers import pipeline
from transformers.pipelines.audio_utils import ffmpeg_microphone_live

asr_model_id = "openai/whisper-tiny.en"
transcriber = pipeline("automatic-speech-recognition",
                       model=asr_model_id,
                       device="cpu")
这里,我使用了Whisper-tiny-en[4]模型,该模型经过 68 万小时的语音数据训练。这是最小的 Whisper 型号;它的文件大小为 151MB。当模型加载后,我们可以使用该ffmpeg_microphone_live方法从麦克风获取数据:
def  transcribe_mic ( chunk_length_s: float ) -> str :
    """ 从麦克风转录音频 """
    global transcriber
    Sample_rate = transcriber.feature_extractor.sampling_rate
    mic = ffmpeg_microphone_live(
            Sample_rate=sampling_rate,
            chunk_length_s=chunk_length_s,
            stream_chunk_s=chunk_length_s,
        )

    result = ""
    for item in transcriber(mic):
        result = item[ "text" ]
        if  not item[ "partial" ][ 0 ]:
            Break
    return result.strip()
Raspberry Pi 没有麦克风,但任何 USB 麦克风都可以完成这项工作。该代码也可以在笔记本电脑上测试;在笔记本上,将使用内置麦克风。
大语言模型
现在,让我们添加大语言模型。首先,我们需要安装所需的库:
pip3 install llama-cpp-python
pip3 install huggingface-hub sentence-transformers langchain
在使用LLM之前,我们需要下载它。正如之前所讨论的,我们有两种选择。对于 8GB Raspberry Pi,我们可以使用 7B 型号。对于 2GB 设备,1B的tiny LLM是唯一可行的选择;较大的模型无法载入RAM。要下载模型,我们可以使用该huggingface-cli工具:
huggingface-cli download TheBloke/Llama-2-7b-Chat-GGUF llama-2-7b-chat.Q4_K_M.gguf --local-dir . --local-dir-use-symlinks False
OR
huggingface-cli download TheBloke/TinyLlama-1.1B-Chat-v1.0-GGUF tinyllama-1.1b-chat-v1.0.Q4_K_M.gguf --local-dir . --local-dir-use-symlinks False
我使用了 Llama-2–7b-Chat-GGUF和 TinyLlama-1–1B-Chat-v1-0-GGUF模型。较小的模型运行速度更快,但较大的模型可能会提供更好的结果。
下载模型后,我们可以使用它:
from langchain.llms import LlamaCpp
from langchain.callbacks.manager import CallbackManager
from langchain.callbacks.streaming_stdout import StreamingStdOutCallbackHandler
from langchain.prompts import PromptTemplate
from langchain.schema.output_parser import StrOutputParser


llm: Optional[LlamaCpp] = None
callback_manager: Any = None

model_file = "tinyllama-1.1b-chat-v1.0.Q4_K_M.gguf"  # OR "llama-2-7b-chat.Q4_K_M.gguf"
template_tiny = """<|system|>
                   You are a smart mini computer named Raspberry Pi.
                   Write a short but funny answer.</s>
                   <|user|>
                   {question}</s>
                   <|assistant|>"""
template_llama = """<s>[INST] <<SYS>>
                    You are a smart mini computer named Raspberry Pi.
                    Write a short but funny answer.</SYS>>
                    {question} [/INST]"""
template = template_tiny


def llm_init():
    """ Load large language model """
    global llm, callback_manager

    callback_manager = CallbackManager([StreamingCustomCallbackHandler()])
    llm = LlamaCpp(
        model_path=model_file,
        temperature=0.1,
        n_gpu_layers=0,
        n_batch=256,
        callback_manager=callback_manager,
        verbose=True,
    )


def llm_start(question: str):
    """ Ask LLM a question """
    global llm, template

    prompt = PromptTemplate(template=template, input_variables=["question"])
    chain = prompt | llm | StrOutputParser()
    chain.invoke({"question": question}, config={})
使用该模型很简单,但接下来:我们需要在 OLED 屏幕上流式地显示答案。为此,我将使用自定义回调,每当 LLM 生成新令牌时都会执行该回调:
class StreamingCustomCallbackHandler(StreamingStdOutCallbackHandler):
    """ Callback handler for LLM streaming """

    def on_llm_start(
        self, serialized: Dict[str, Any], prompts: List[str], **kwargs: Any
    ) -> None:
        """ Run when LLM starts running """
        print("<LLM Started>")

    def on_llm_end(self, response: Any, **kwargs: Any) -> None:
        """ Run when LLM ends running """
        print("<LLM Ended>")

    def on_llm_new_token(self, token: str, **kwargs: Any) -> None:
        """ Run on new LLM token. Only available when streaming is enabled """
        print(f"{token}", end="")
        add_display_tokens(token)
测试
最后,组合所有部分。代码很简单:
if __name__ == "__main__":
    add_display_line("Init automatic speech recogntion...")
    asr_init()

    add_display_line("Init LLaMA GPT...")
    llm_init()

    while True:
        # Q-A loop:
        add_display_line("Start speaking")
        add_display_line("")
        question = transcribe_mic(chunk_length_s=5.0)
        if len(question) > 0:
            add_display_tokens(f"> {question}")
            add_display_line("")

            llm_start(question)
这里,Raspberry Pi 在 5 秒内录制音频,然后语音识别模型将音频转换为文本;最后,将识别出的文本发送给LLM。结束后,重复该过程。这种方法可以改进,例如,通过使用自动音频电平阈值,但对于一个weekend demo来说,它已经足够好了。
在树莓派上运行成功后,输出如下所示:

在这里,我们可以看到 Raspberry Pi 4 上的 1B LLM 推理速度。Raspberry Pi 5 应该快 30-40%。
我没有使用任何基准(例如 BLEU 或 ROUGE)来比较 1B 和 7B 型号的质量。主观上,7B 模型提供了更正确、信息更丰富的答案,但它也需要更多 RAM、更多加载时间(文件大小分别为 4.6 和 0.7GB),并且运行速度慢 3-5 倍。至于功耗,Raspberry Pi 4 在运行模型、连接 OLED 屏幕和 USB 麦克风的情况下平均需要 3-5W。
结论
在本文中,我们在树莓派上运行了语音识别和大语言模型,使得树莓派能够理解我们的语音并做出回复。这样的demo也是边缘端GPT模型的一个有趣的里程碑:GPT正在进入智能设备时代,这些设备将能够理解人类语音、响应文本命令或执行不同的操作。
从视频中我们可以看到,LLM的回复速度还是有点慢。但根据摩尔定律, 5-10 年后,相同的模型将轻松运行在 1 美元的芯片上,就像现在我们可以运行成熟的 PDP-11 模拟器(PDP在80年代的时候价值10 万美元)在 5 美元的 ESP32 板上。
参考资料
[1]7B LLaMA-2 GPT: https://huggingface.co/TheBloke/Llama-2-7B-Chat-GGUF
[2]TinyLlama-1B: https://huggingface.co/TheBloke/TinyLlama-1.1B-Chat-v1.0-GGUF
[3]Transformers: https://huggingface.co/docs/transformers/main_classes/pipelines
[4]Whisper-tiny-en: https://huggingface.co/openai/whisper-tiny.en

但是这两个模型完美放大了 LLM的典型缺陷:喜欢胡说八道
中文的有没有本地部署的推荐?
中文的现在都不太行
请问语音识别可以识别中文吗
目前还不能的
换个中文的whisper模型
請問怎麽安裝 transformers.pipelines.audio_utils import ffmpeg_microphone_live, 試了幾次都不太行