M.2 HAT+
About
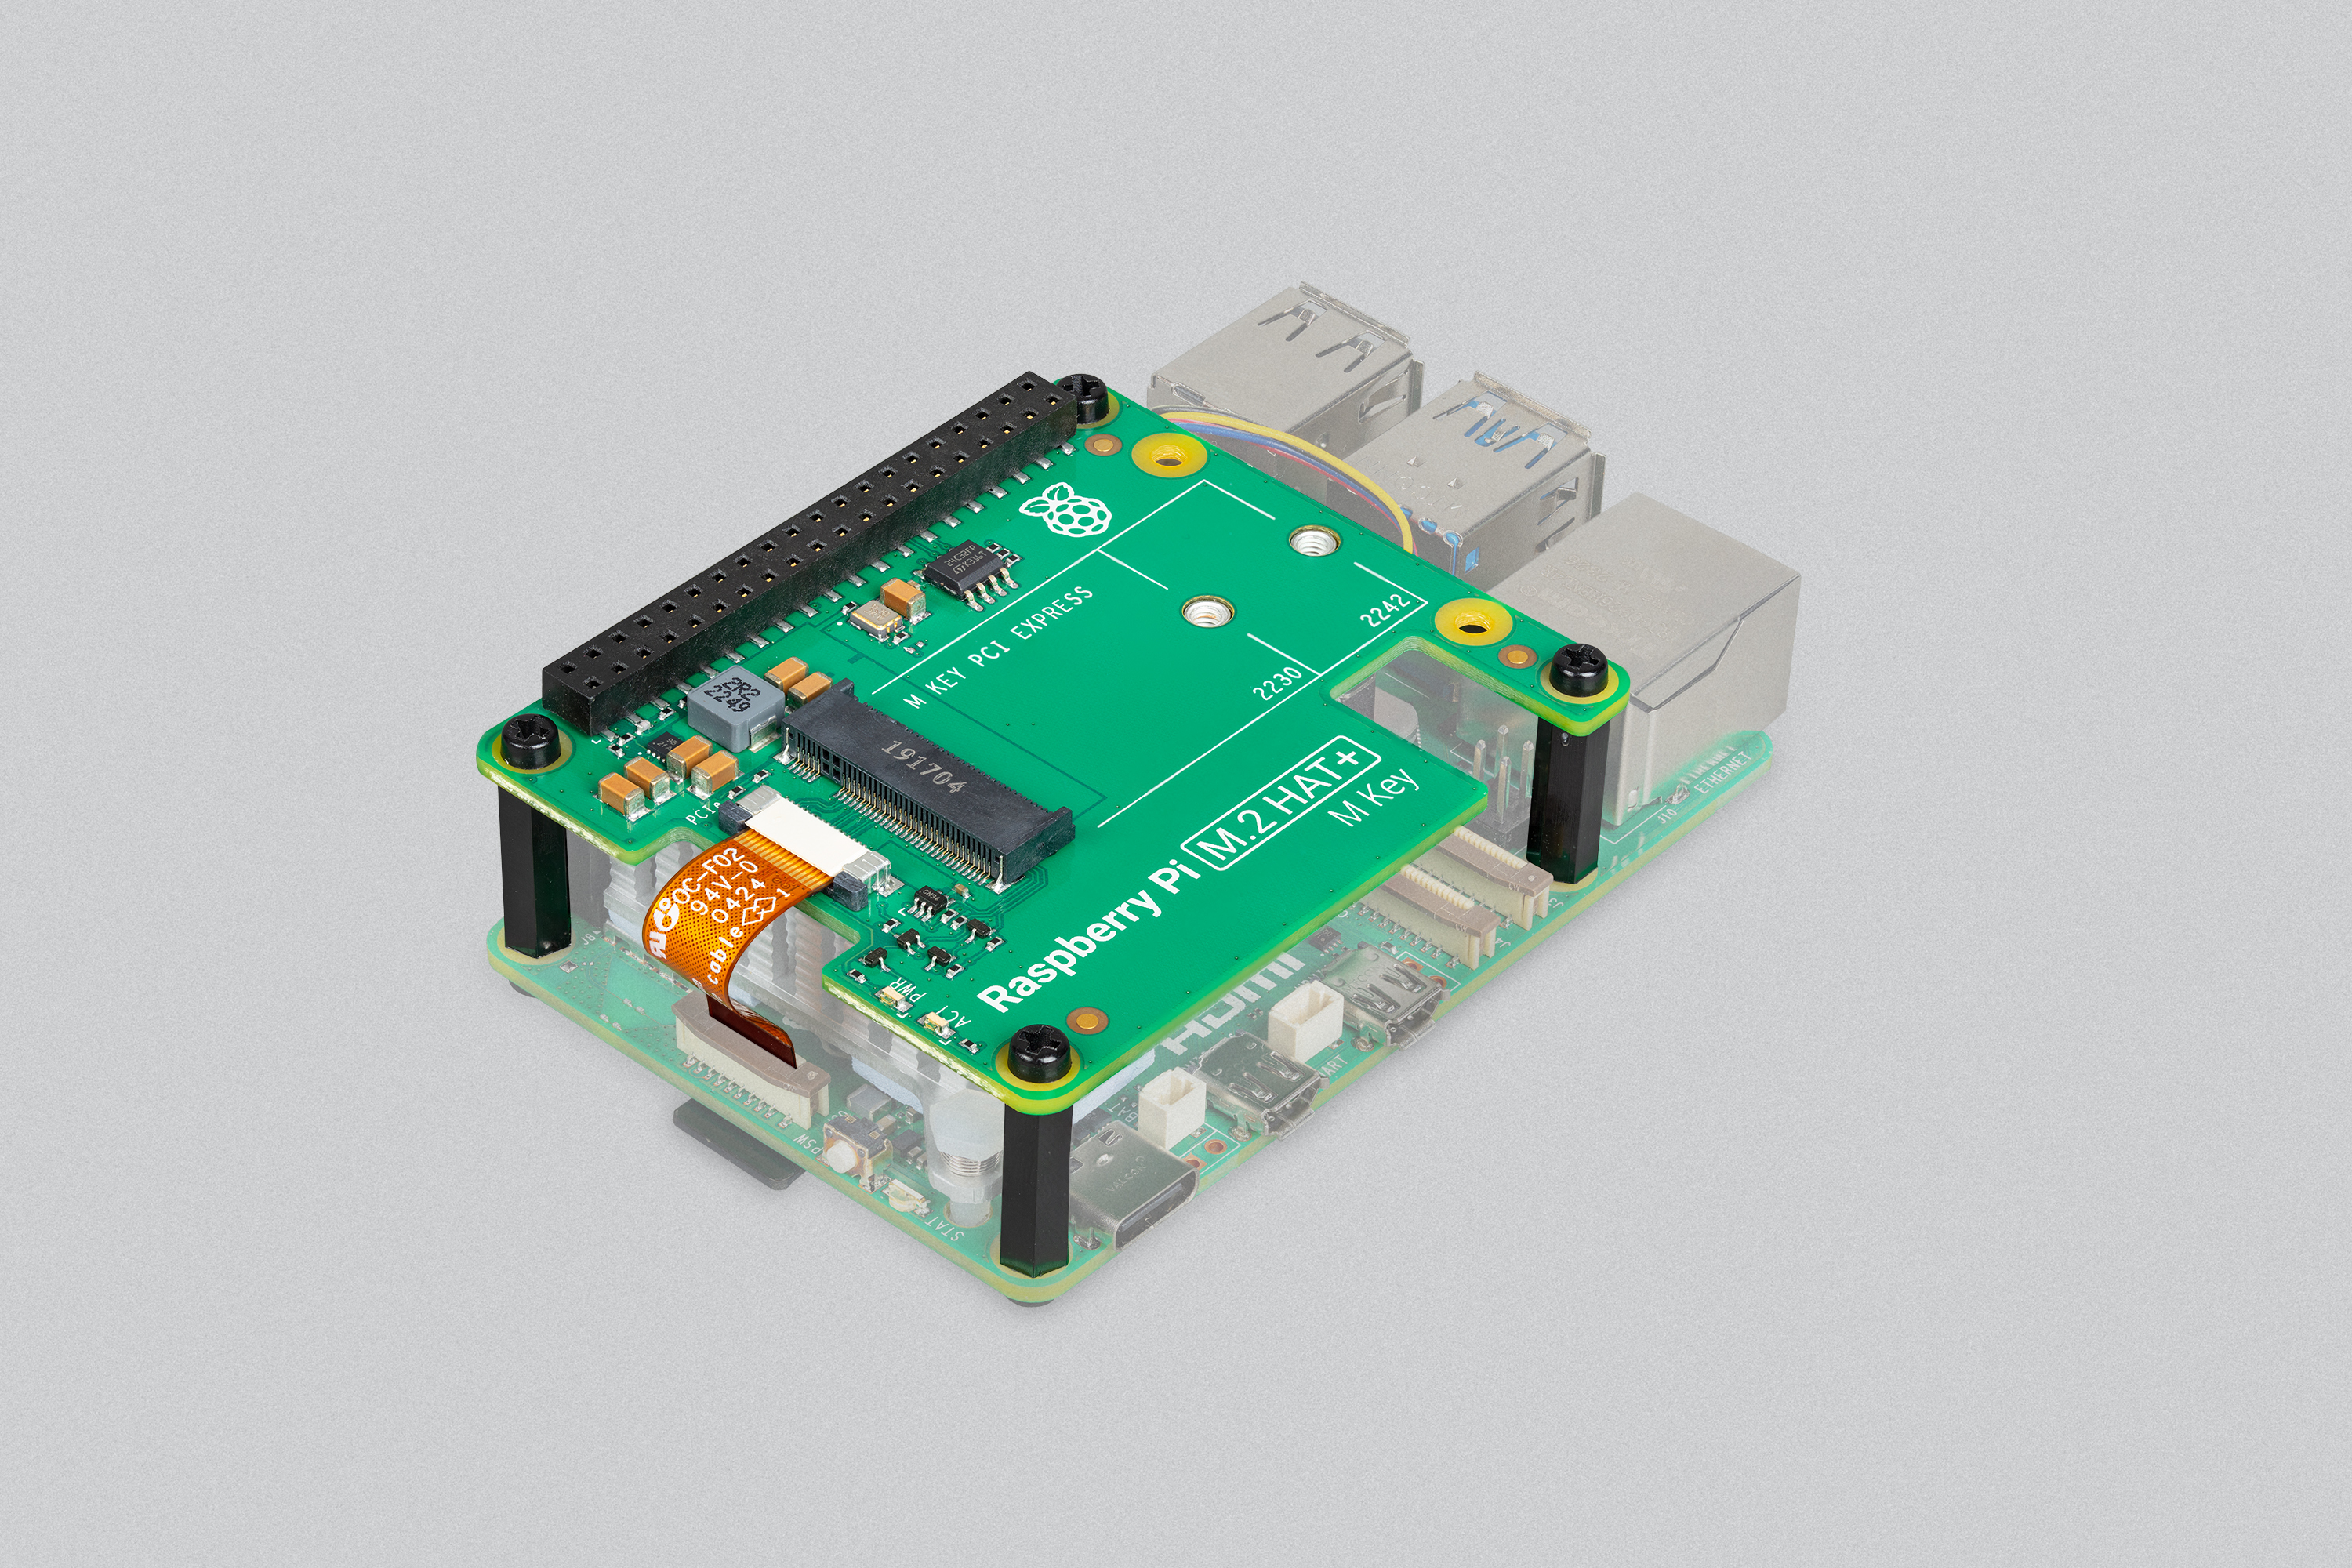
The Raspberry Pi M.2 HAT+ M Key enables you to connect M.2 peripherals such as NVMe drives and other PCIe accessories to Raspberry Pi 5’s PCIe interface.
The M.2 HAT+ adapter board converts between the PCIe connector on Raspberry Pi 5 and a single M.2 M key edge connector. You can connect any device that uses the 2230 or 2242 form factors. The M.2 HAT+ can supply up to 3A of power.
The M.2 HAT+ uses Raspberry Pi’s HAT+ specification, which allows Raspberry Pi OS to automatically detect the HAT+ and any connected devices.
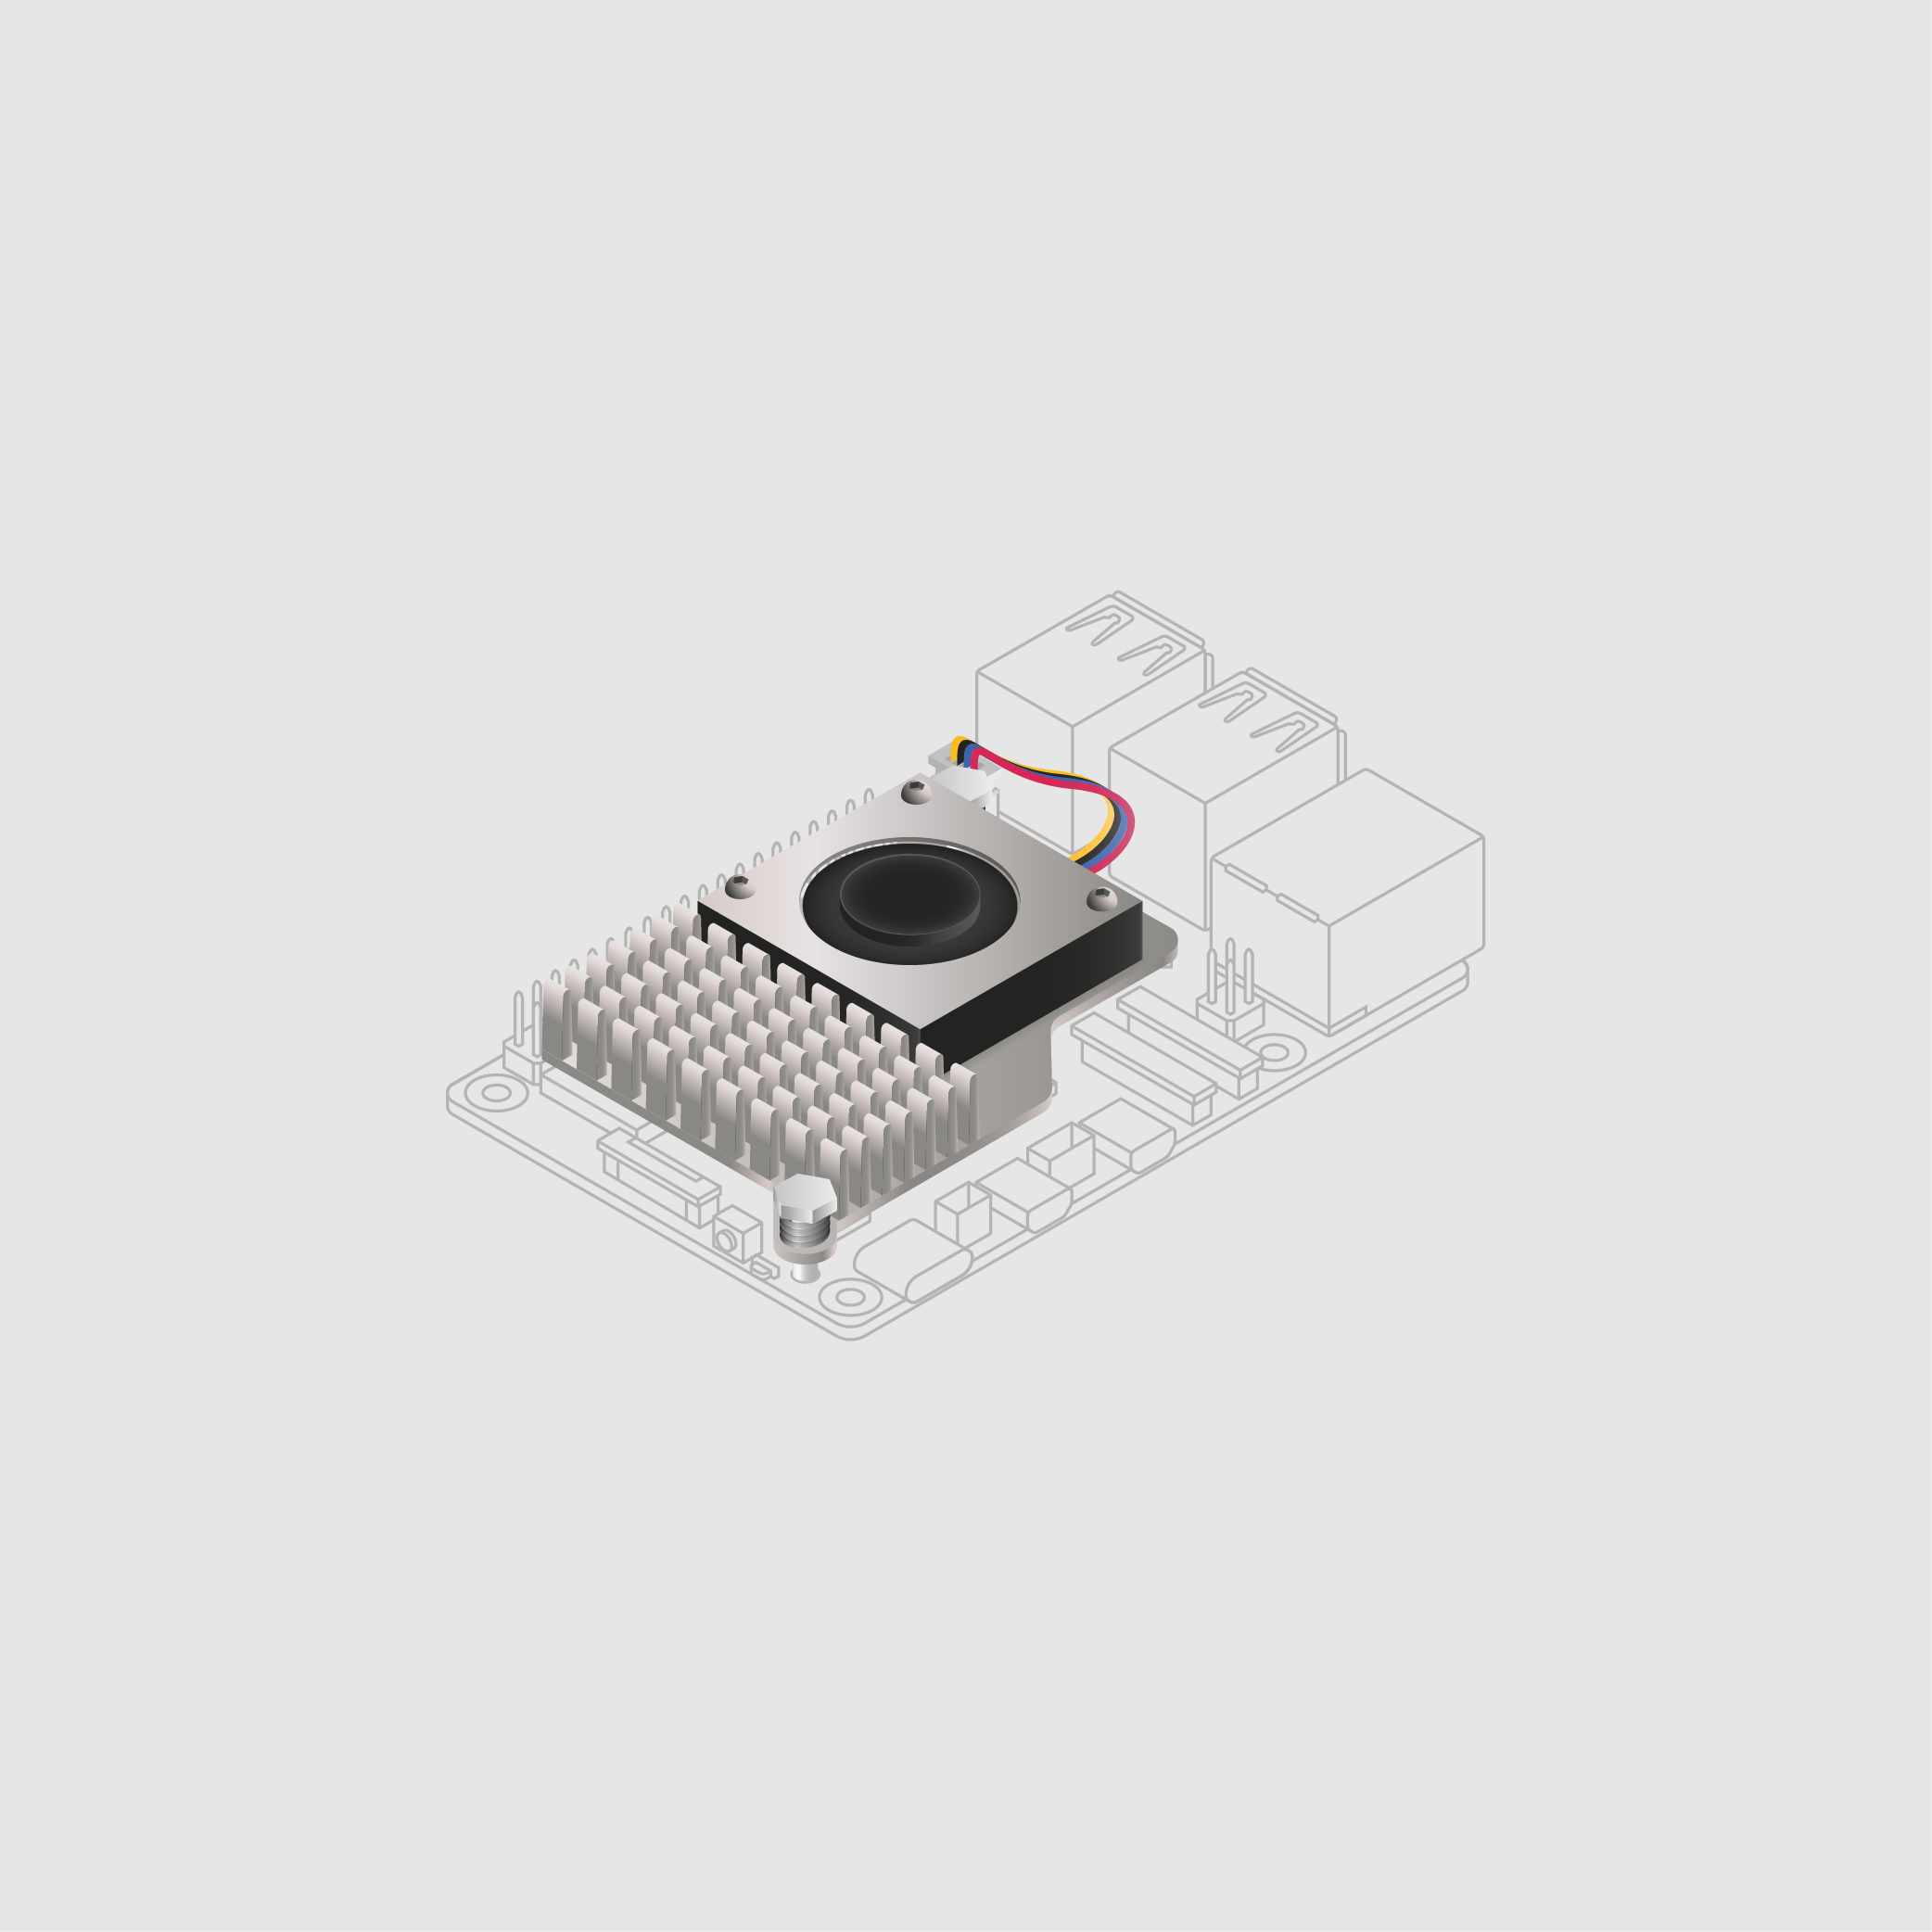
The included threaded spacers provide ample room to fit the Raspberry Pi Active Cooler beneath an M.2 HAT+.
The M.2 HAT+ is only compatible with the Raspberry Pi Case for Raspberry Pi 5 if you remove the lid and the included fan.
Features
-
Single-lane PCIe 2.0 interface (500 MB/s peak transfer rate)
-
Supports devices that use the M.2 M key edge connector
-
Supports devices with the 2230 or 2242 form factor
-
Supplies up to 3A to connected M.2 devices
-
Power and activity LEDs
-
Conforms to the Raspberry Pi HAT+ specification
-
Includes:
-
ribbon cable
-
16mm GPIO stacking header
-
4 threaded spacers
-
8 screws
-
1 knurled double-flanged drive attachment screw to secure and support the M.2 peripheral
-
Install
To use the Raspberry Pi M.2 HAT+, you will need:
-
a Raspberry Pi 5
Each M.2 HAT+ comes with a ribbon cable, GPIO stacking header, and mounting hardware. Complete the following instructions to install your M.2 HAT+:
-
First, ensure that your Raspberry Pi runs the latest software. Run the following command to update:
$ sudo apt update && sudo apt full-upgrade -
Next, ensure that your Raspberry Pi firmware is up-to-date. Run the following command to see what firmware you’re running:
$ sudo rpi-eeprom-updateIf you see December 6, 2023 or a later date, proceed to the next step. If you see a date earlier than December 6, 2023, run the following command to open the Raspberry Pi Configuration CLI:
$ sudo raspi-configUnder
Advanced Options>Bootloader Version, chooseLatest. Then, exitraspi-configwithFinishor the Escape key.Run the following command to update your firmware to the latest version:
$ sudo rpi-eeprom-update -aThen, reboot with
sudo reboot. -
Disconnect the Raspberry Pi from power before beginning installation.
-
The M.2 HAT+ is compatible with the Raspberry Pi 5 Active Cooler. If you have an Active Cooler, install it before installing the M.2 HAT+.
-
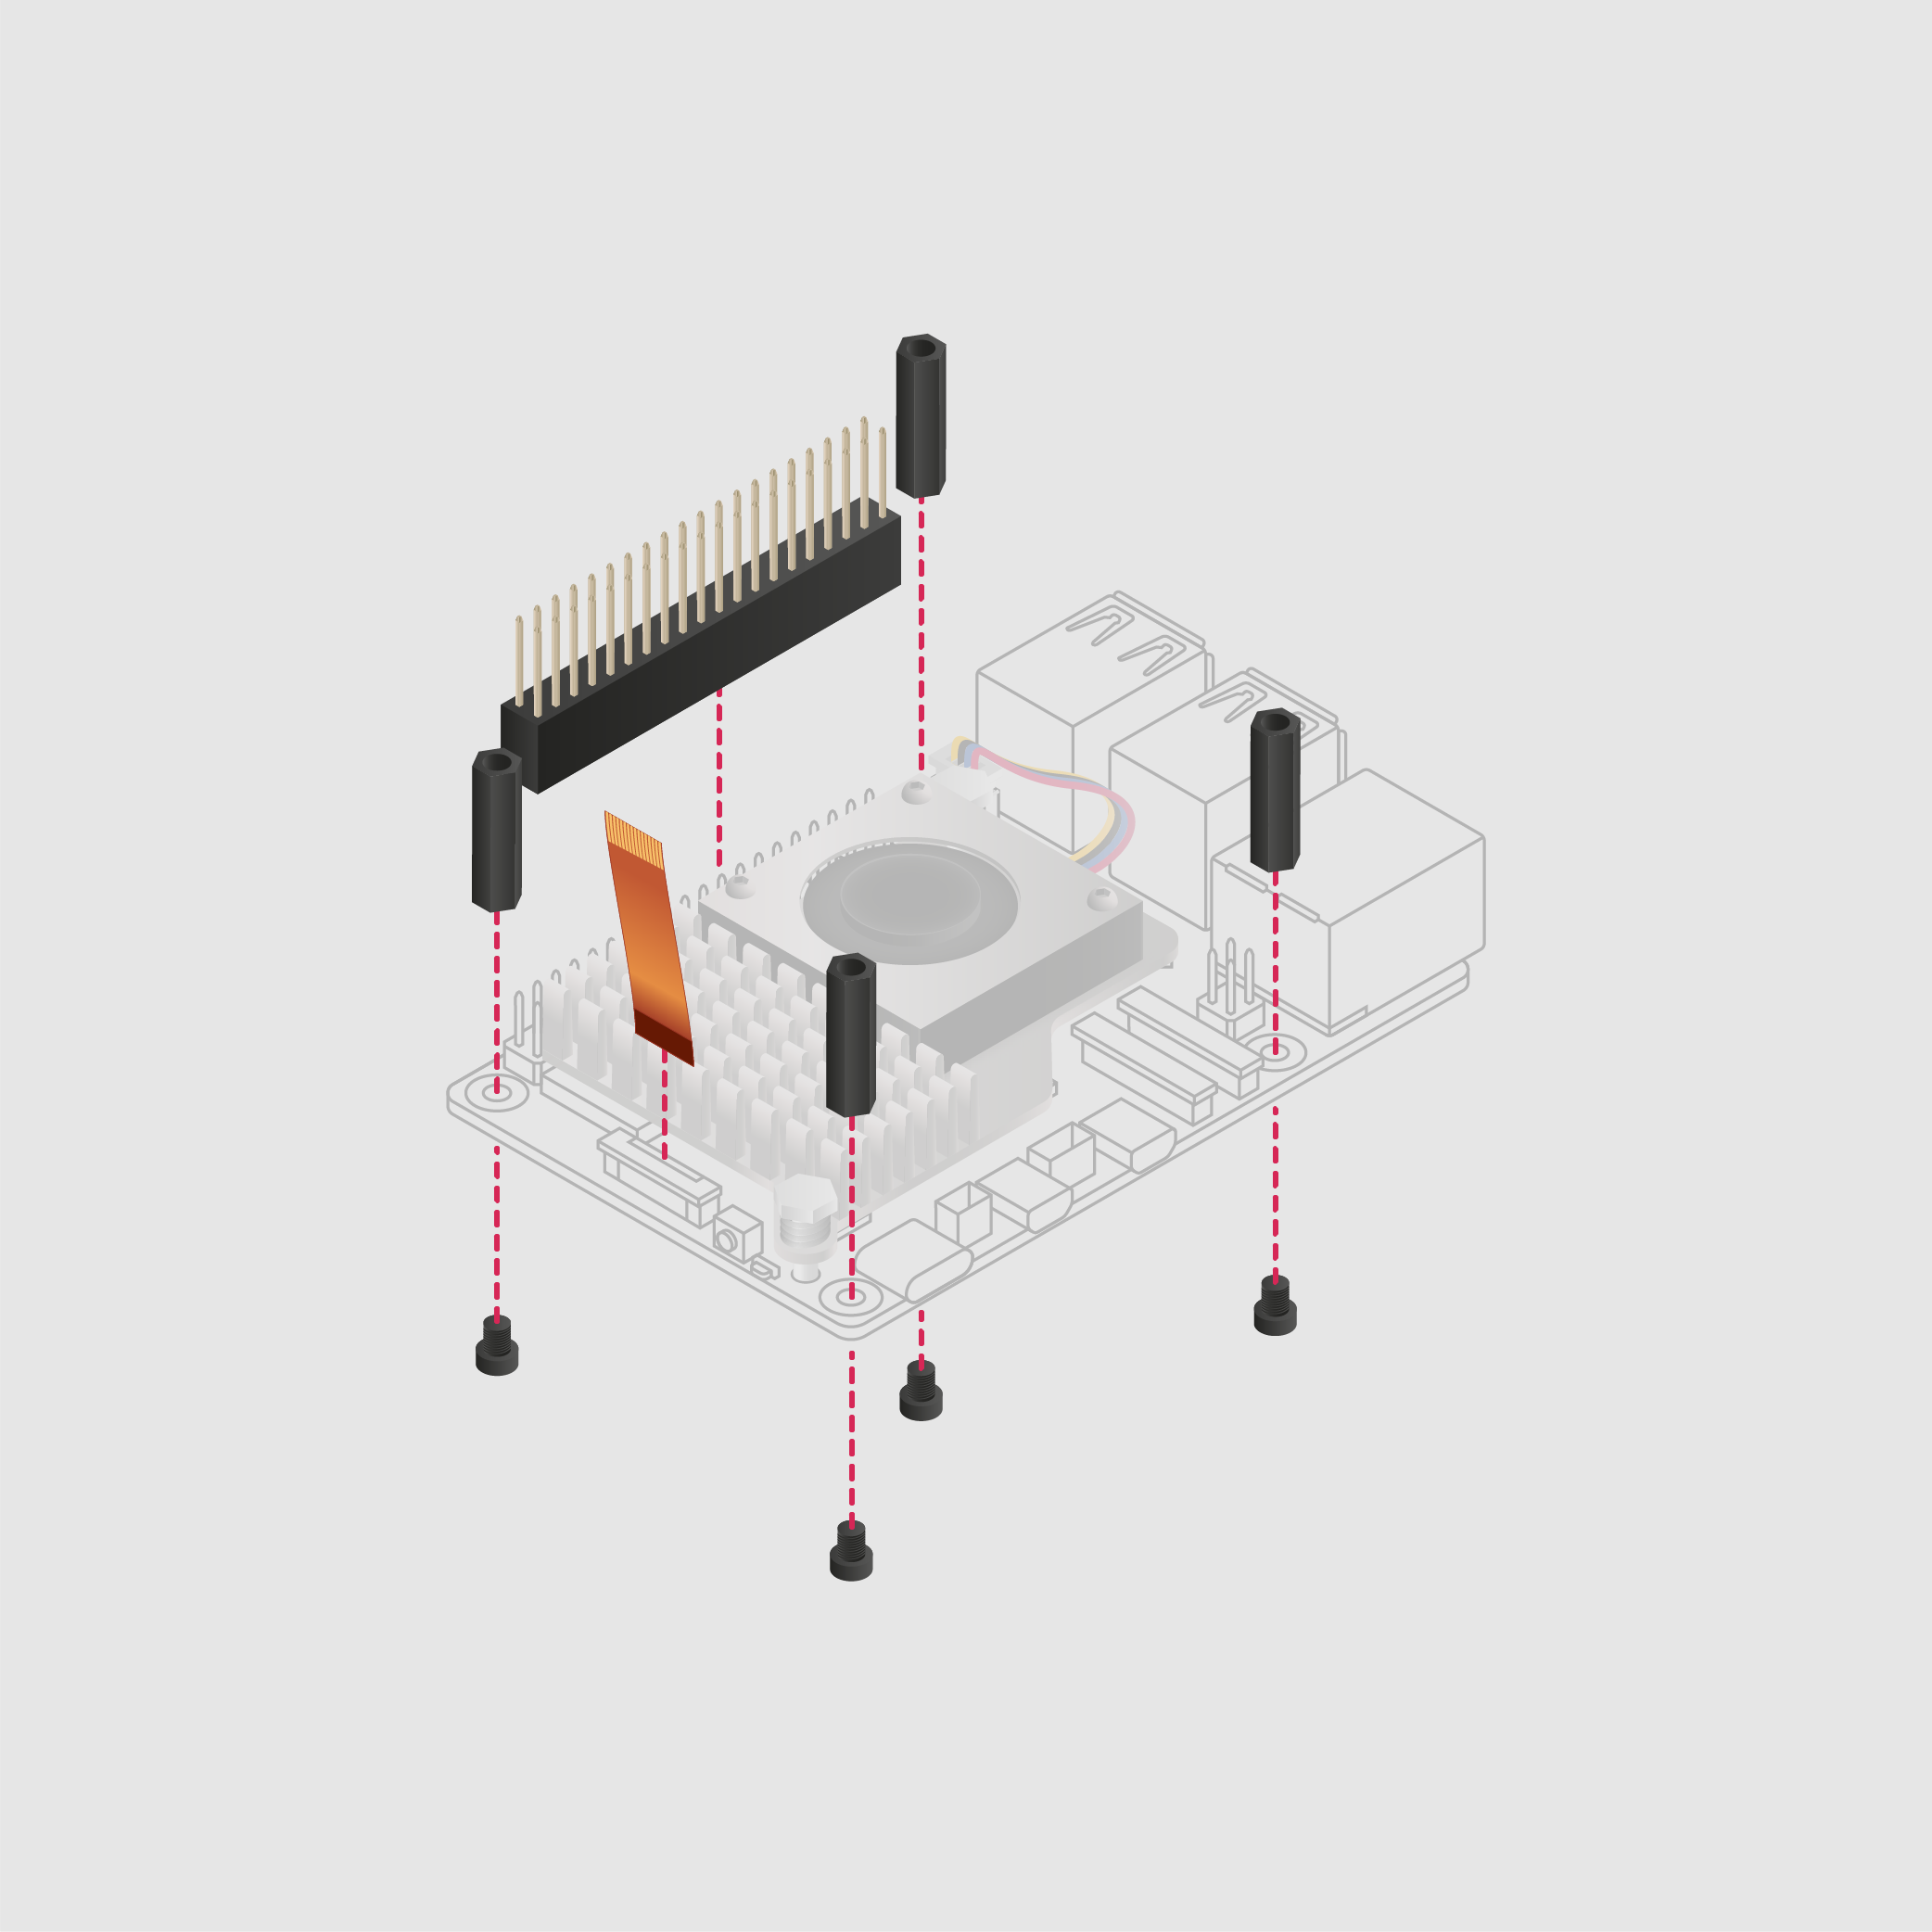
Install the spacers using four of the provided screws. Firmly press the GPIO stacking header on top of the Raspberry Pi GPIO pins; orientation does not matter as long as all pins fit into place. Disconnect the ribbon cable from the M.2 HAT+, and insert the other end into the PCIe port of your Raspberry Pi. Lift the ribbon cable holder from both sides, then insert the cable with the copper contact points facing inward, towards the USB ports. With the ribbon cable fully and evenly inserted into the PCIe port, push the cable holder down from both sides to secure the ribbon cable firmly in place.
-
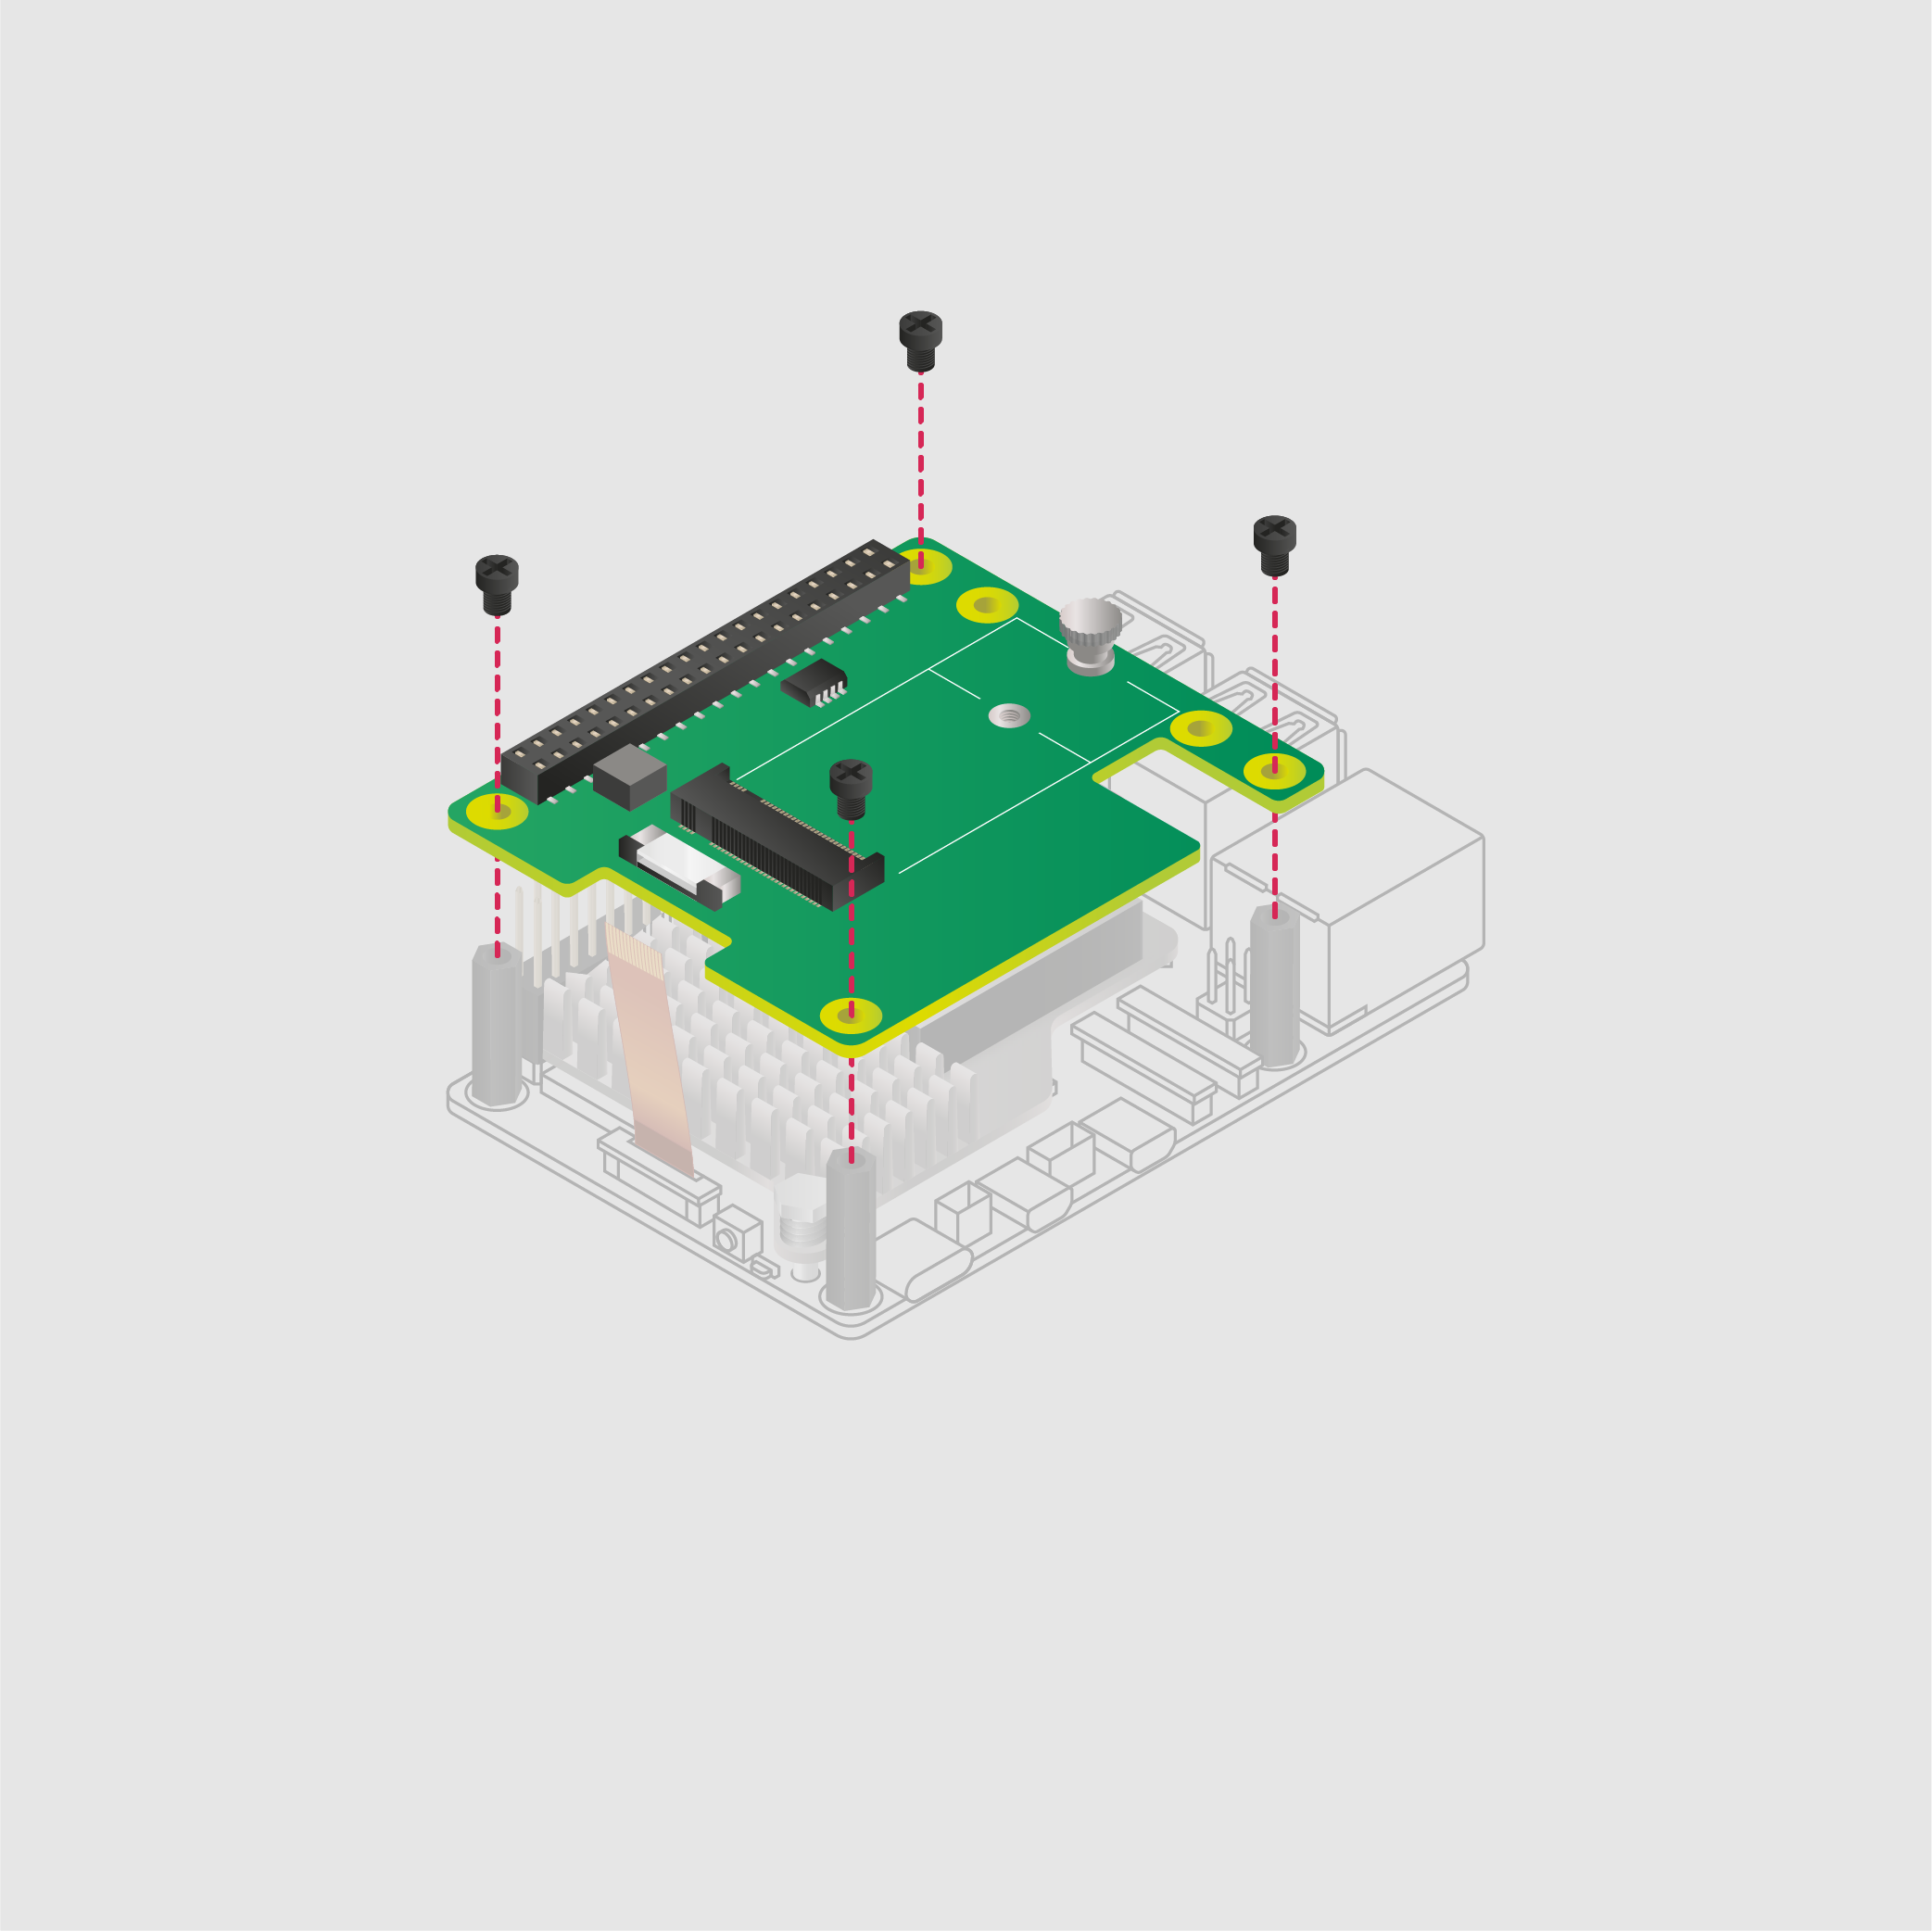
Set the M.2 HAT+ on top of the spacers, and use the four remaining screws to secure it in place.
-
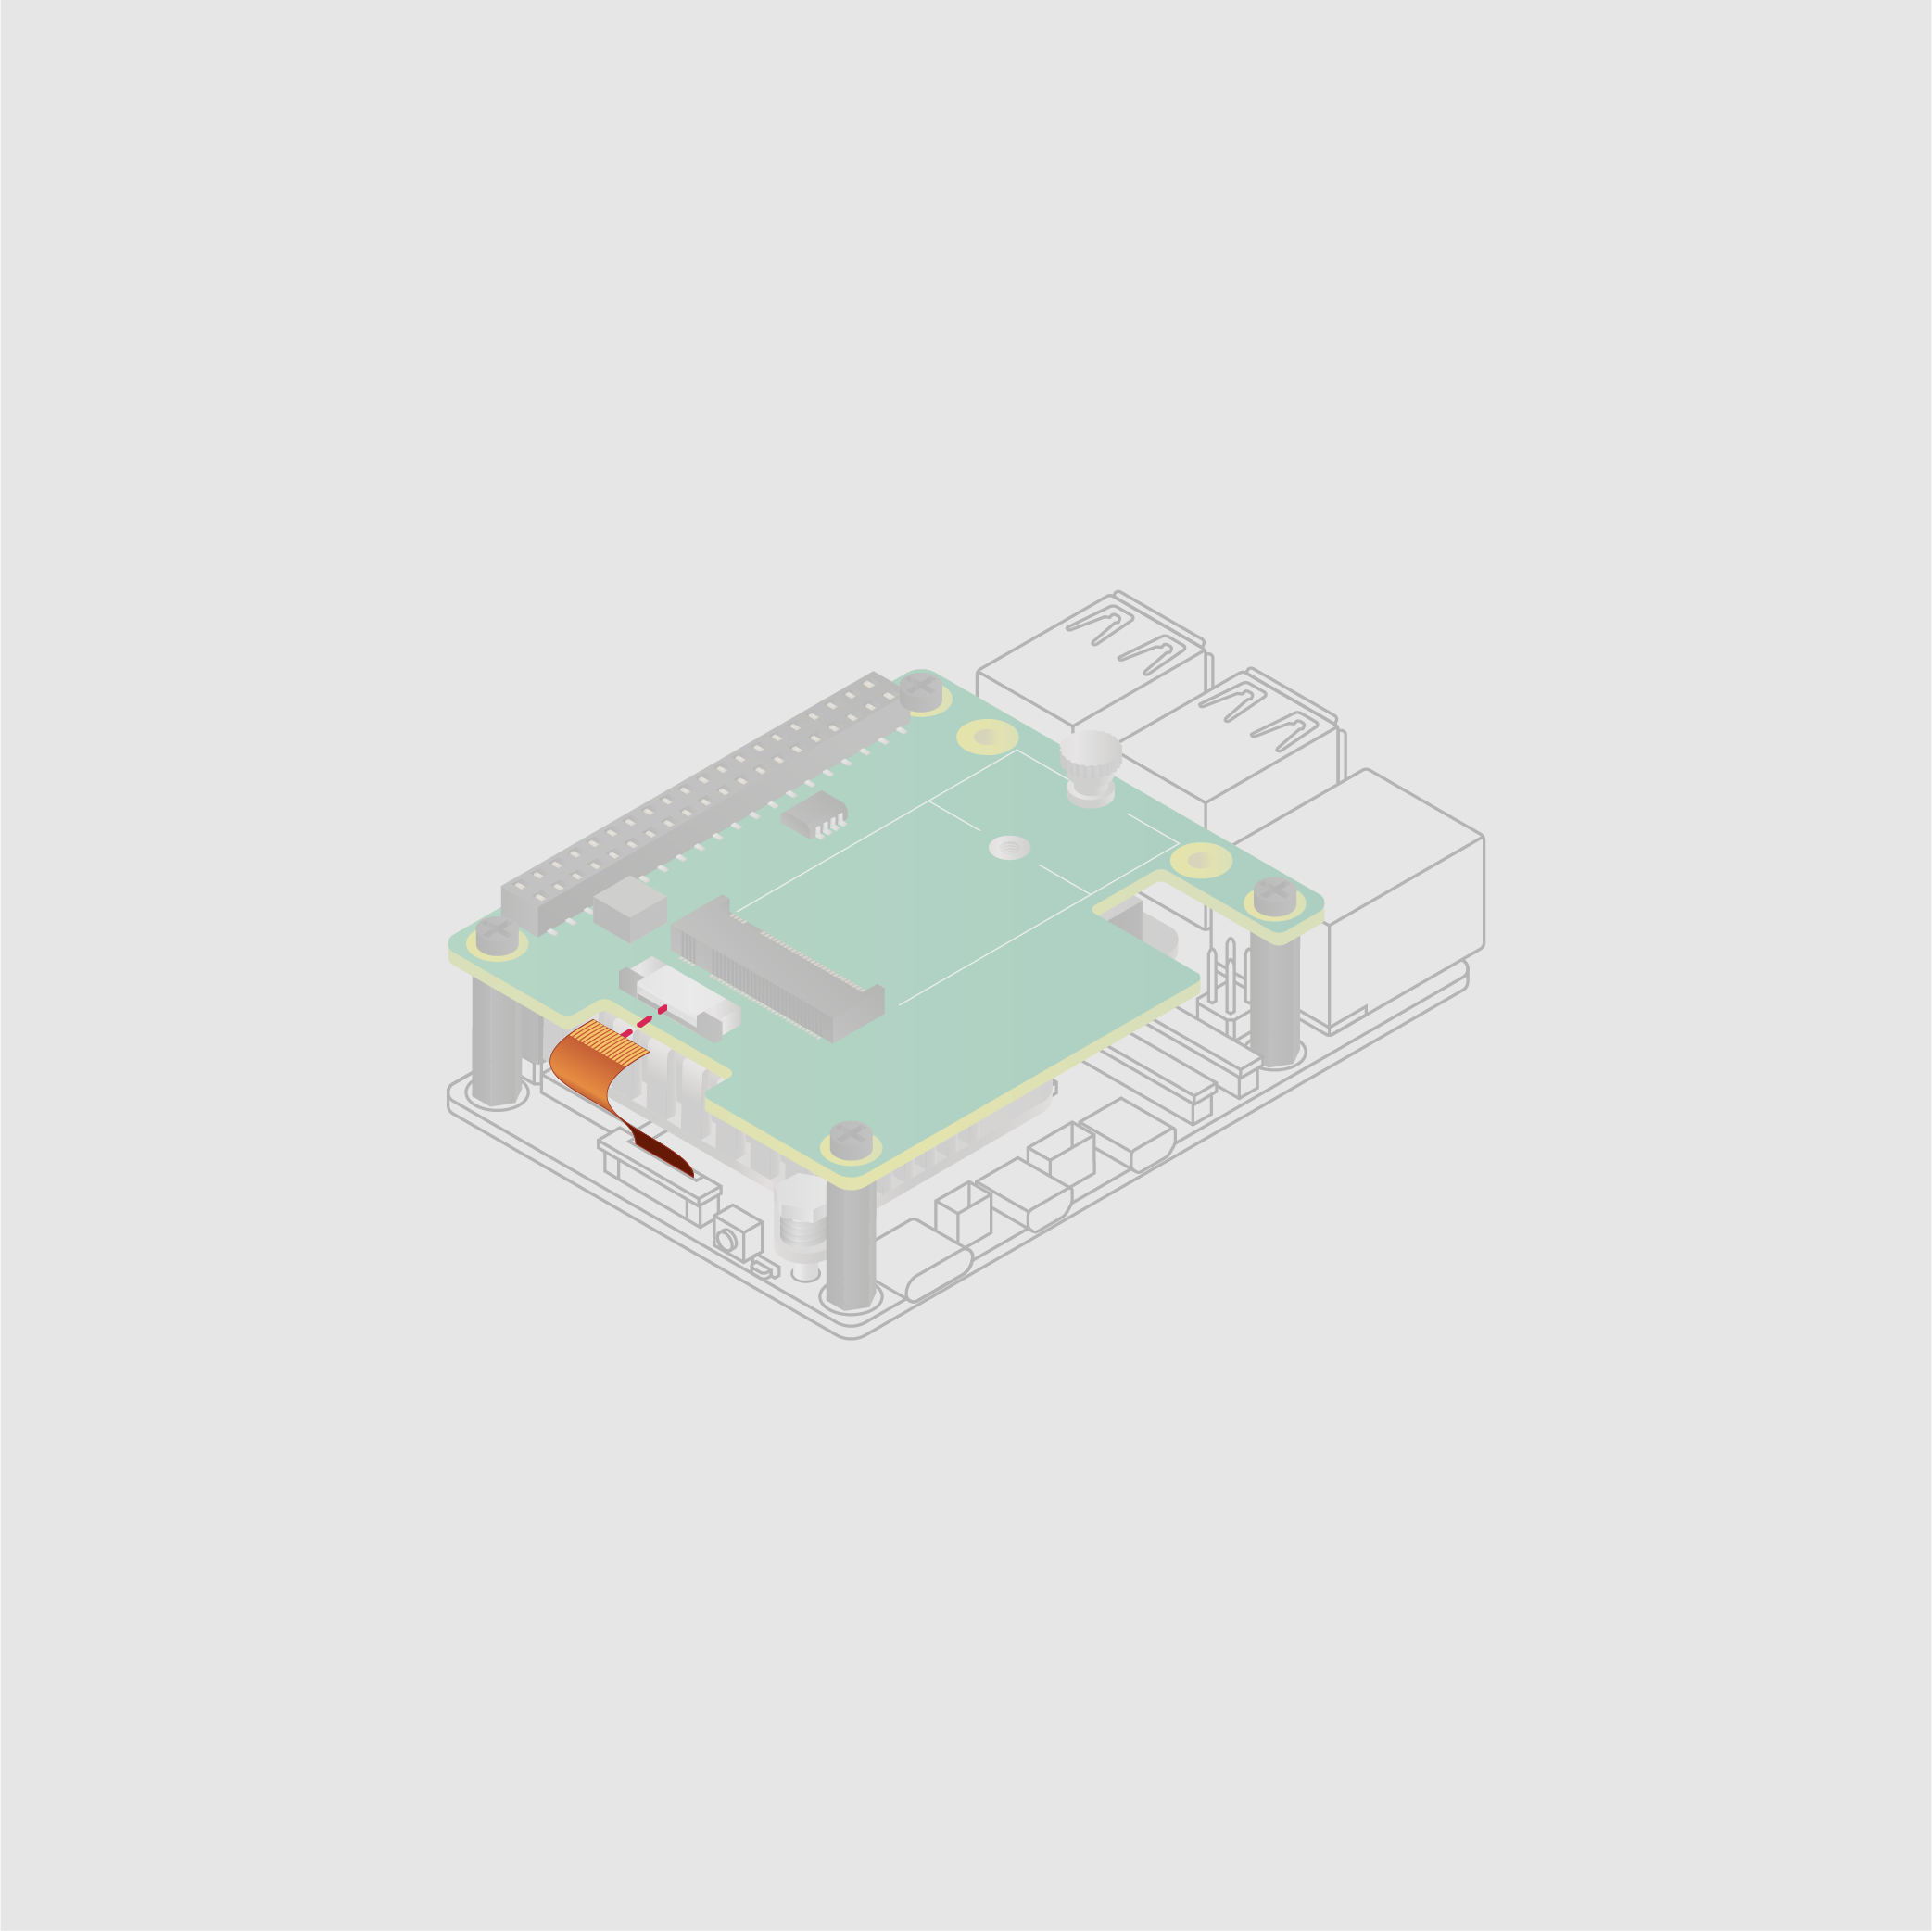
Insert the ribbon cable into the slot on the M.2 HAT+. Lift the ribbon cable holder from both sides, then insert the cable with the copper contact points facing up. With the ribbon cable fully and evenly inserted into the port, push the cable holder down from both sides to secure the ribbon cable firmly in place.
-
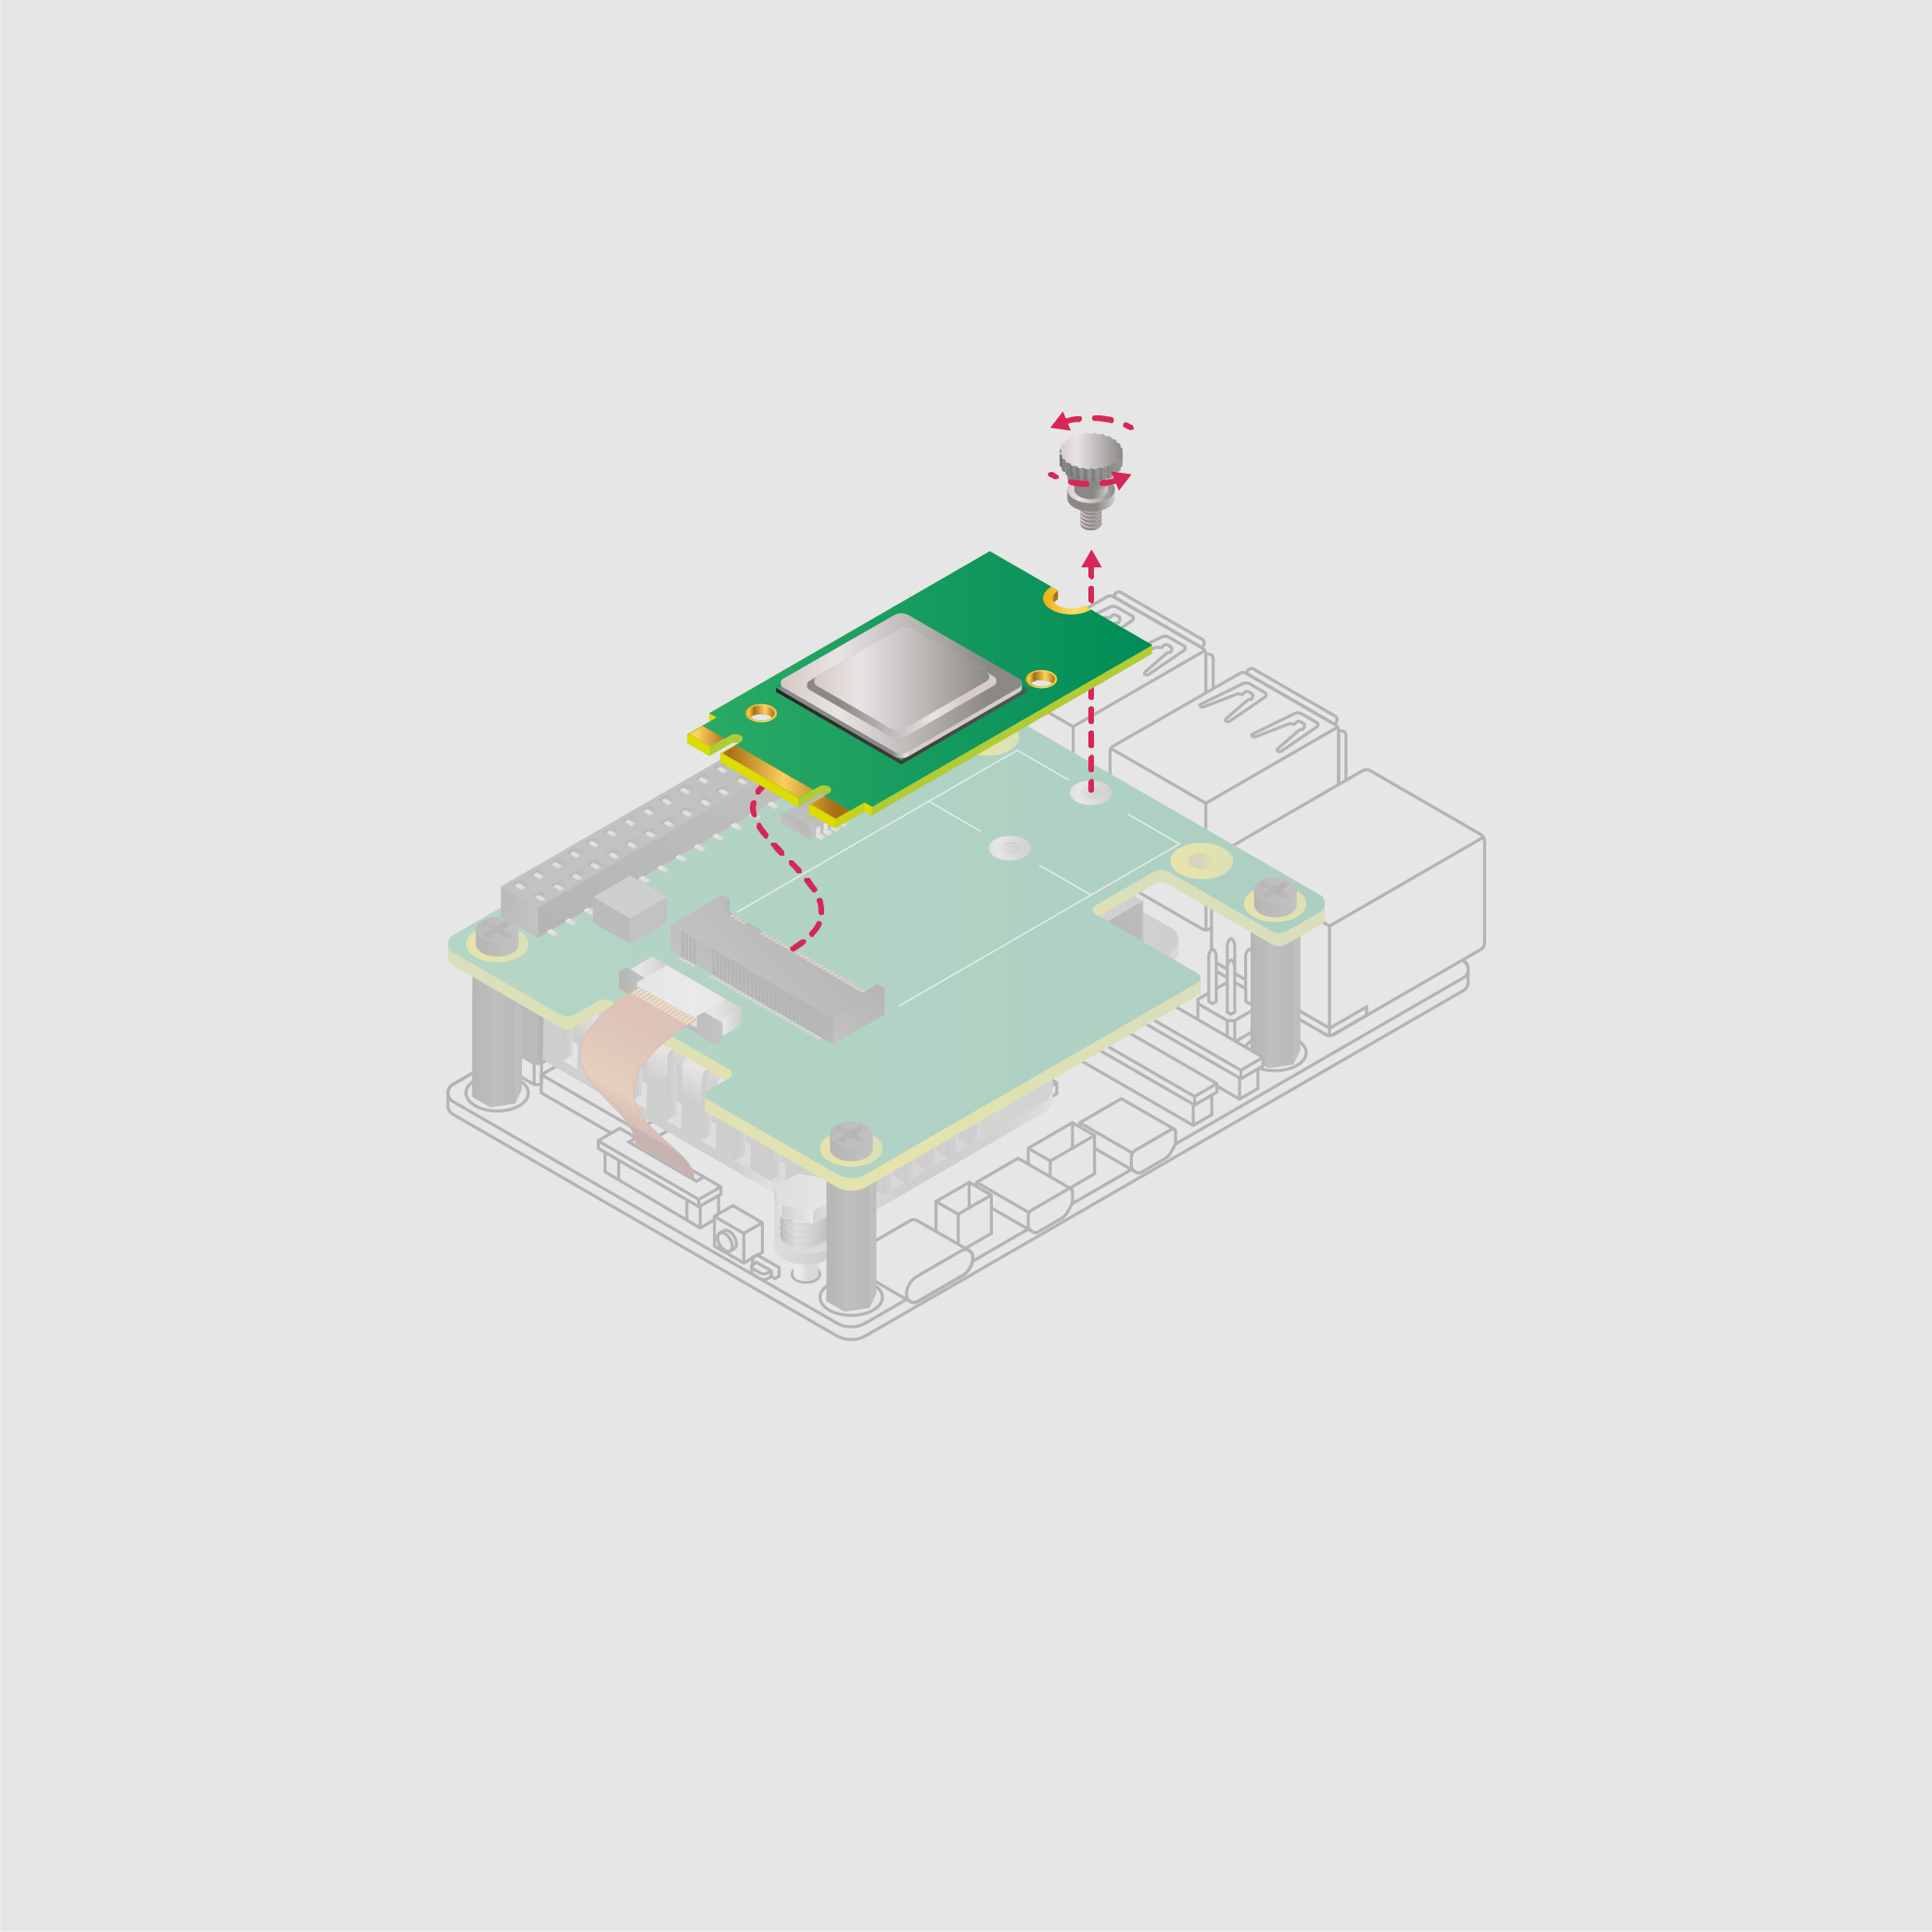
Remove the drive attachment screw by turning the screw counter-clockwise. Insert your M.2 SSD into the M.2 key edge connector, sliding the drive into the slot at a slight upward angle. Do not force the drive into the slot: it should slide in gently.
-
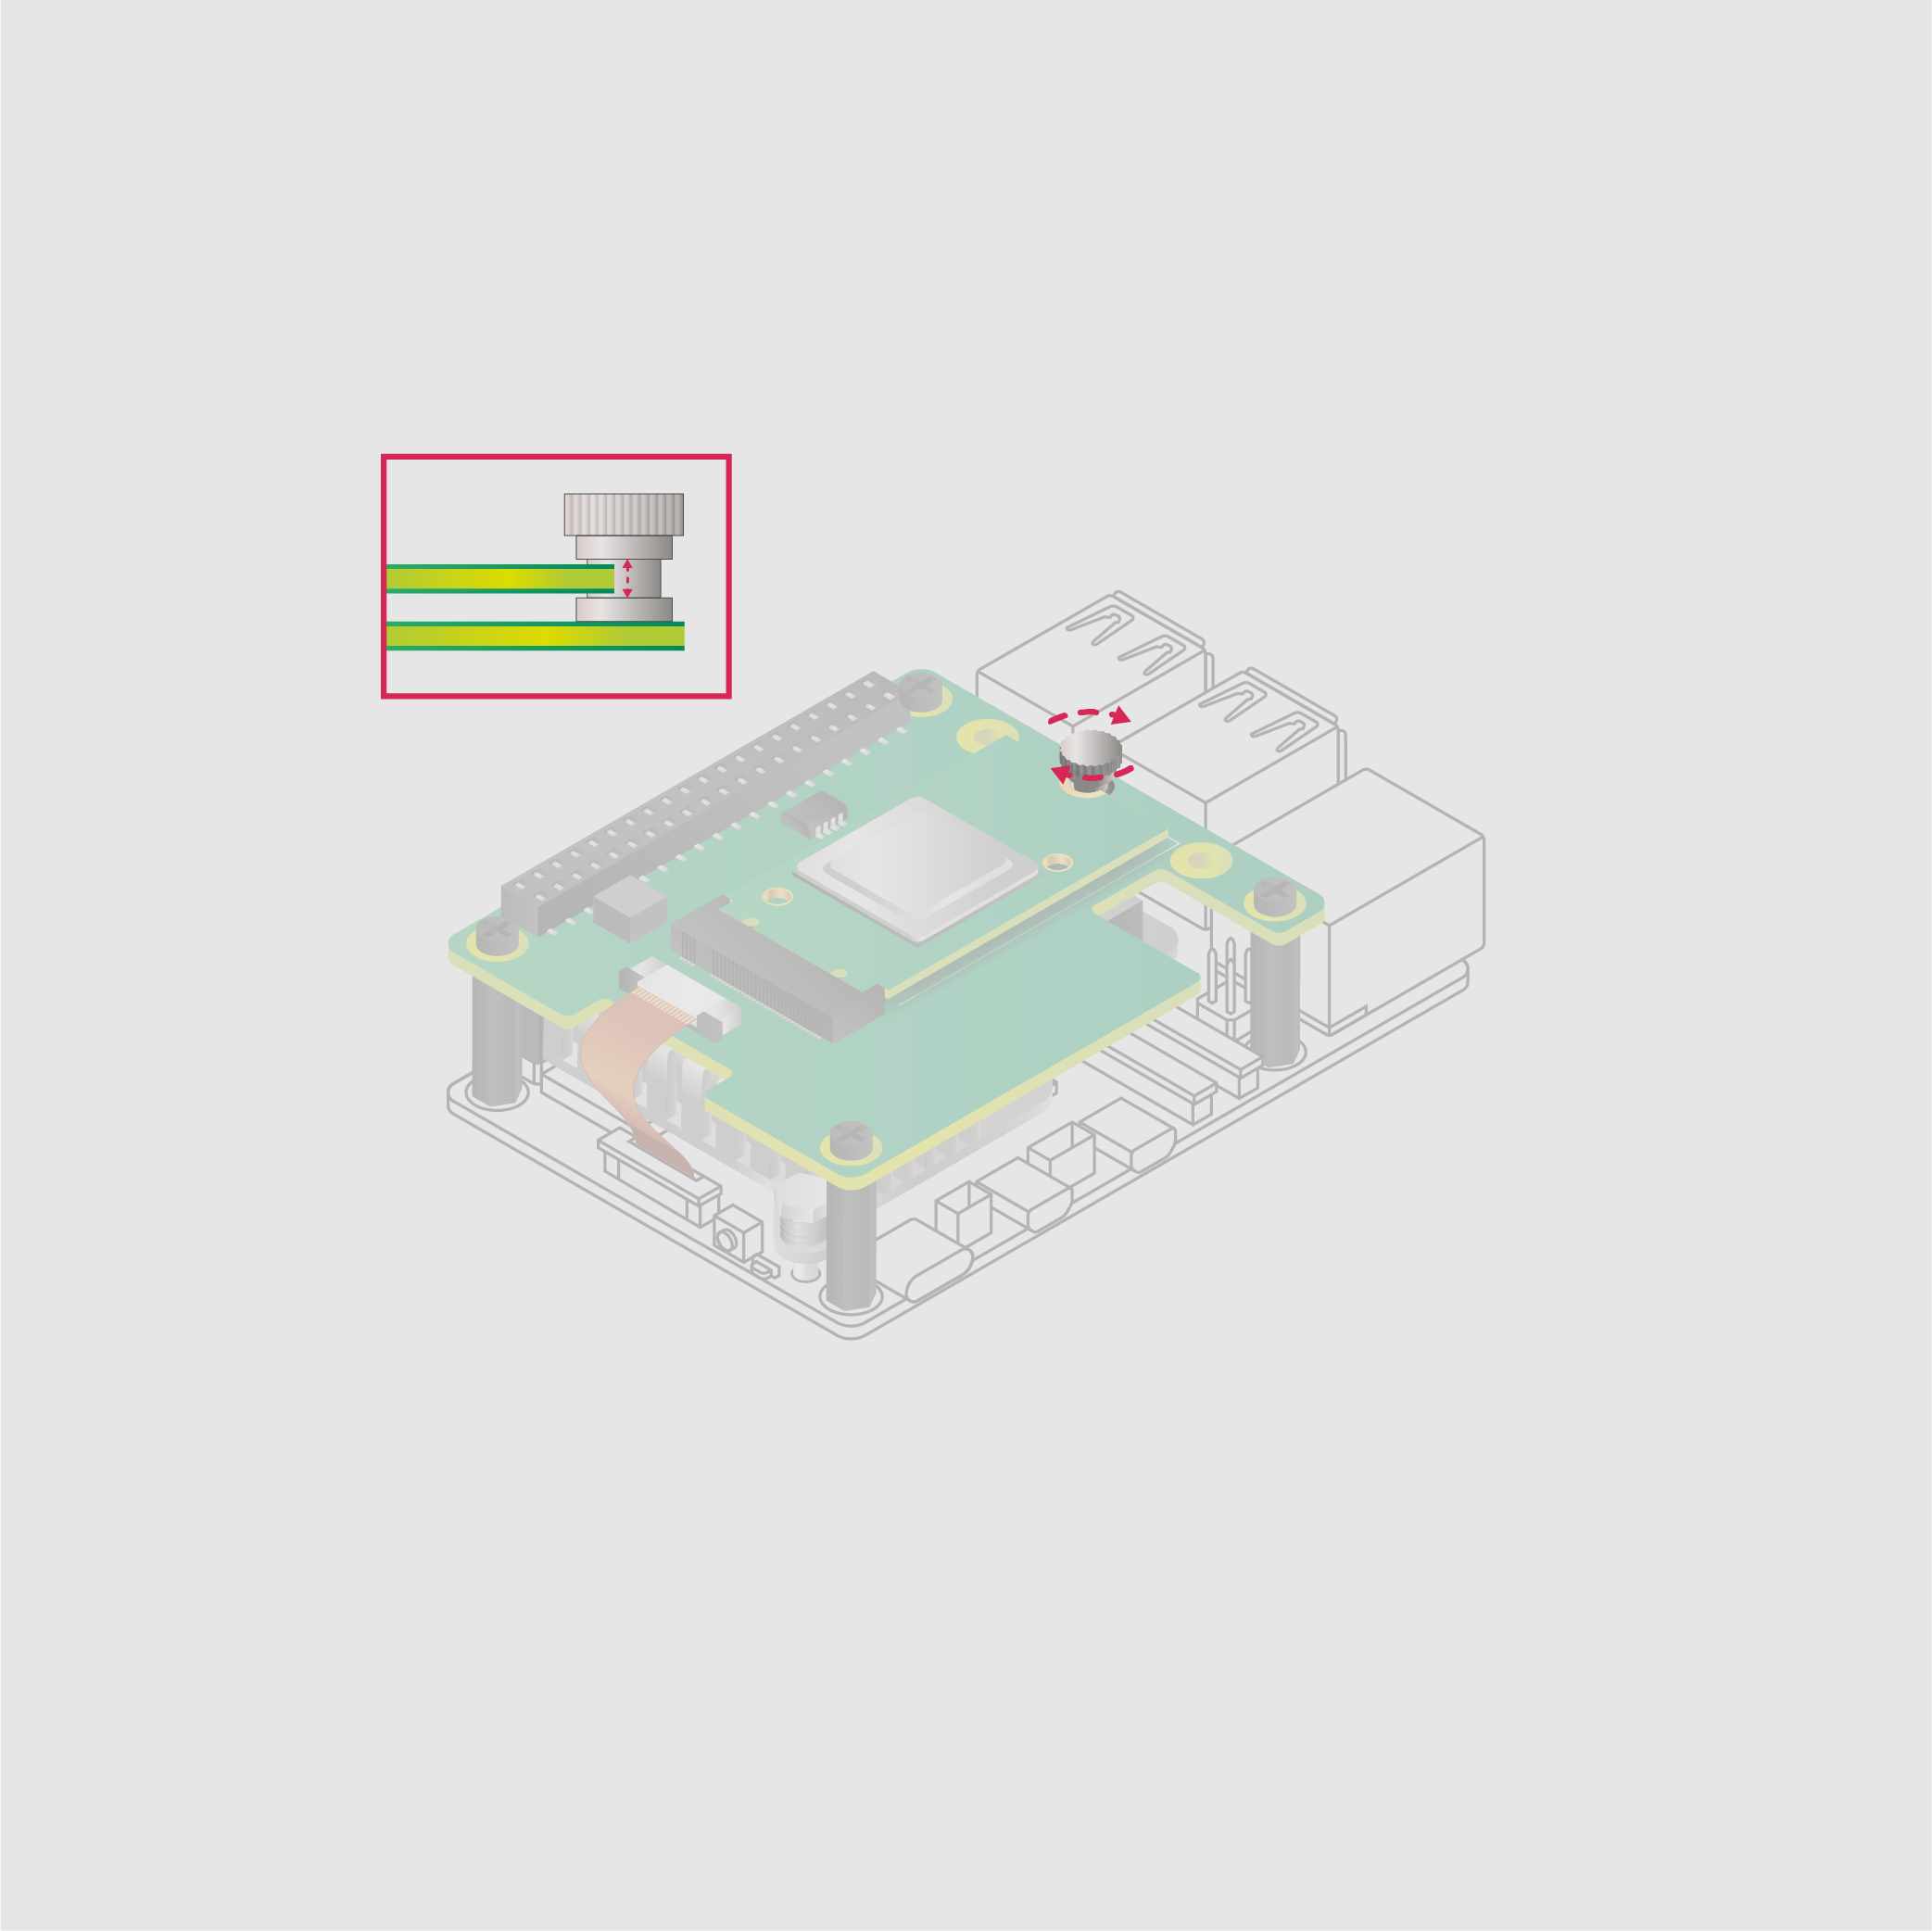
Push the notch on the drive attachment screw into the slot at the end of your M.2 drive. Push the drive flat against the M.2 HAT+, and insert the SSD attachment screw by turning the screw clockwise until the SSD feels secure. Do not over-tighten the screw.
-
Congratulations, you have successfully installed the M.2 HAT+. Connect your Raspberry Pi to power; Raspberry Pi OS will automatically detect the M.2 HAT+. If you use Raspberry Pi Desktop, you should see an icon representing the drive on your desktop. If you don’t use a desktop, you can find the drive at
/dev/nvme0n1. To make your drive automatically available for file access, consider configuring automatic mounting.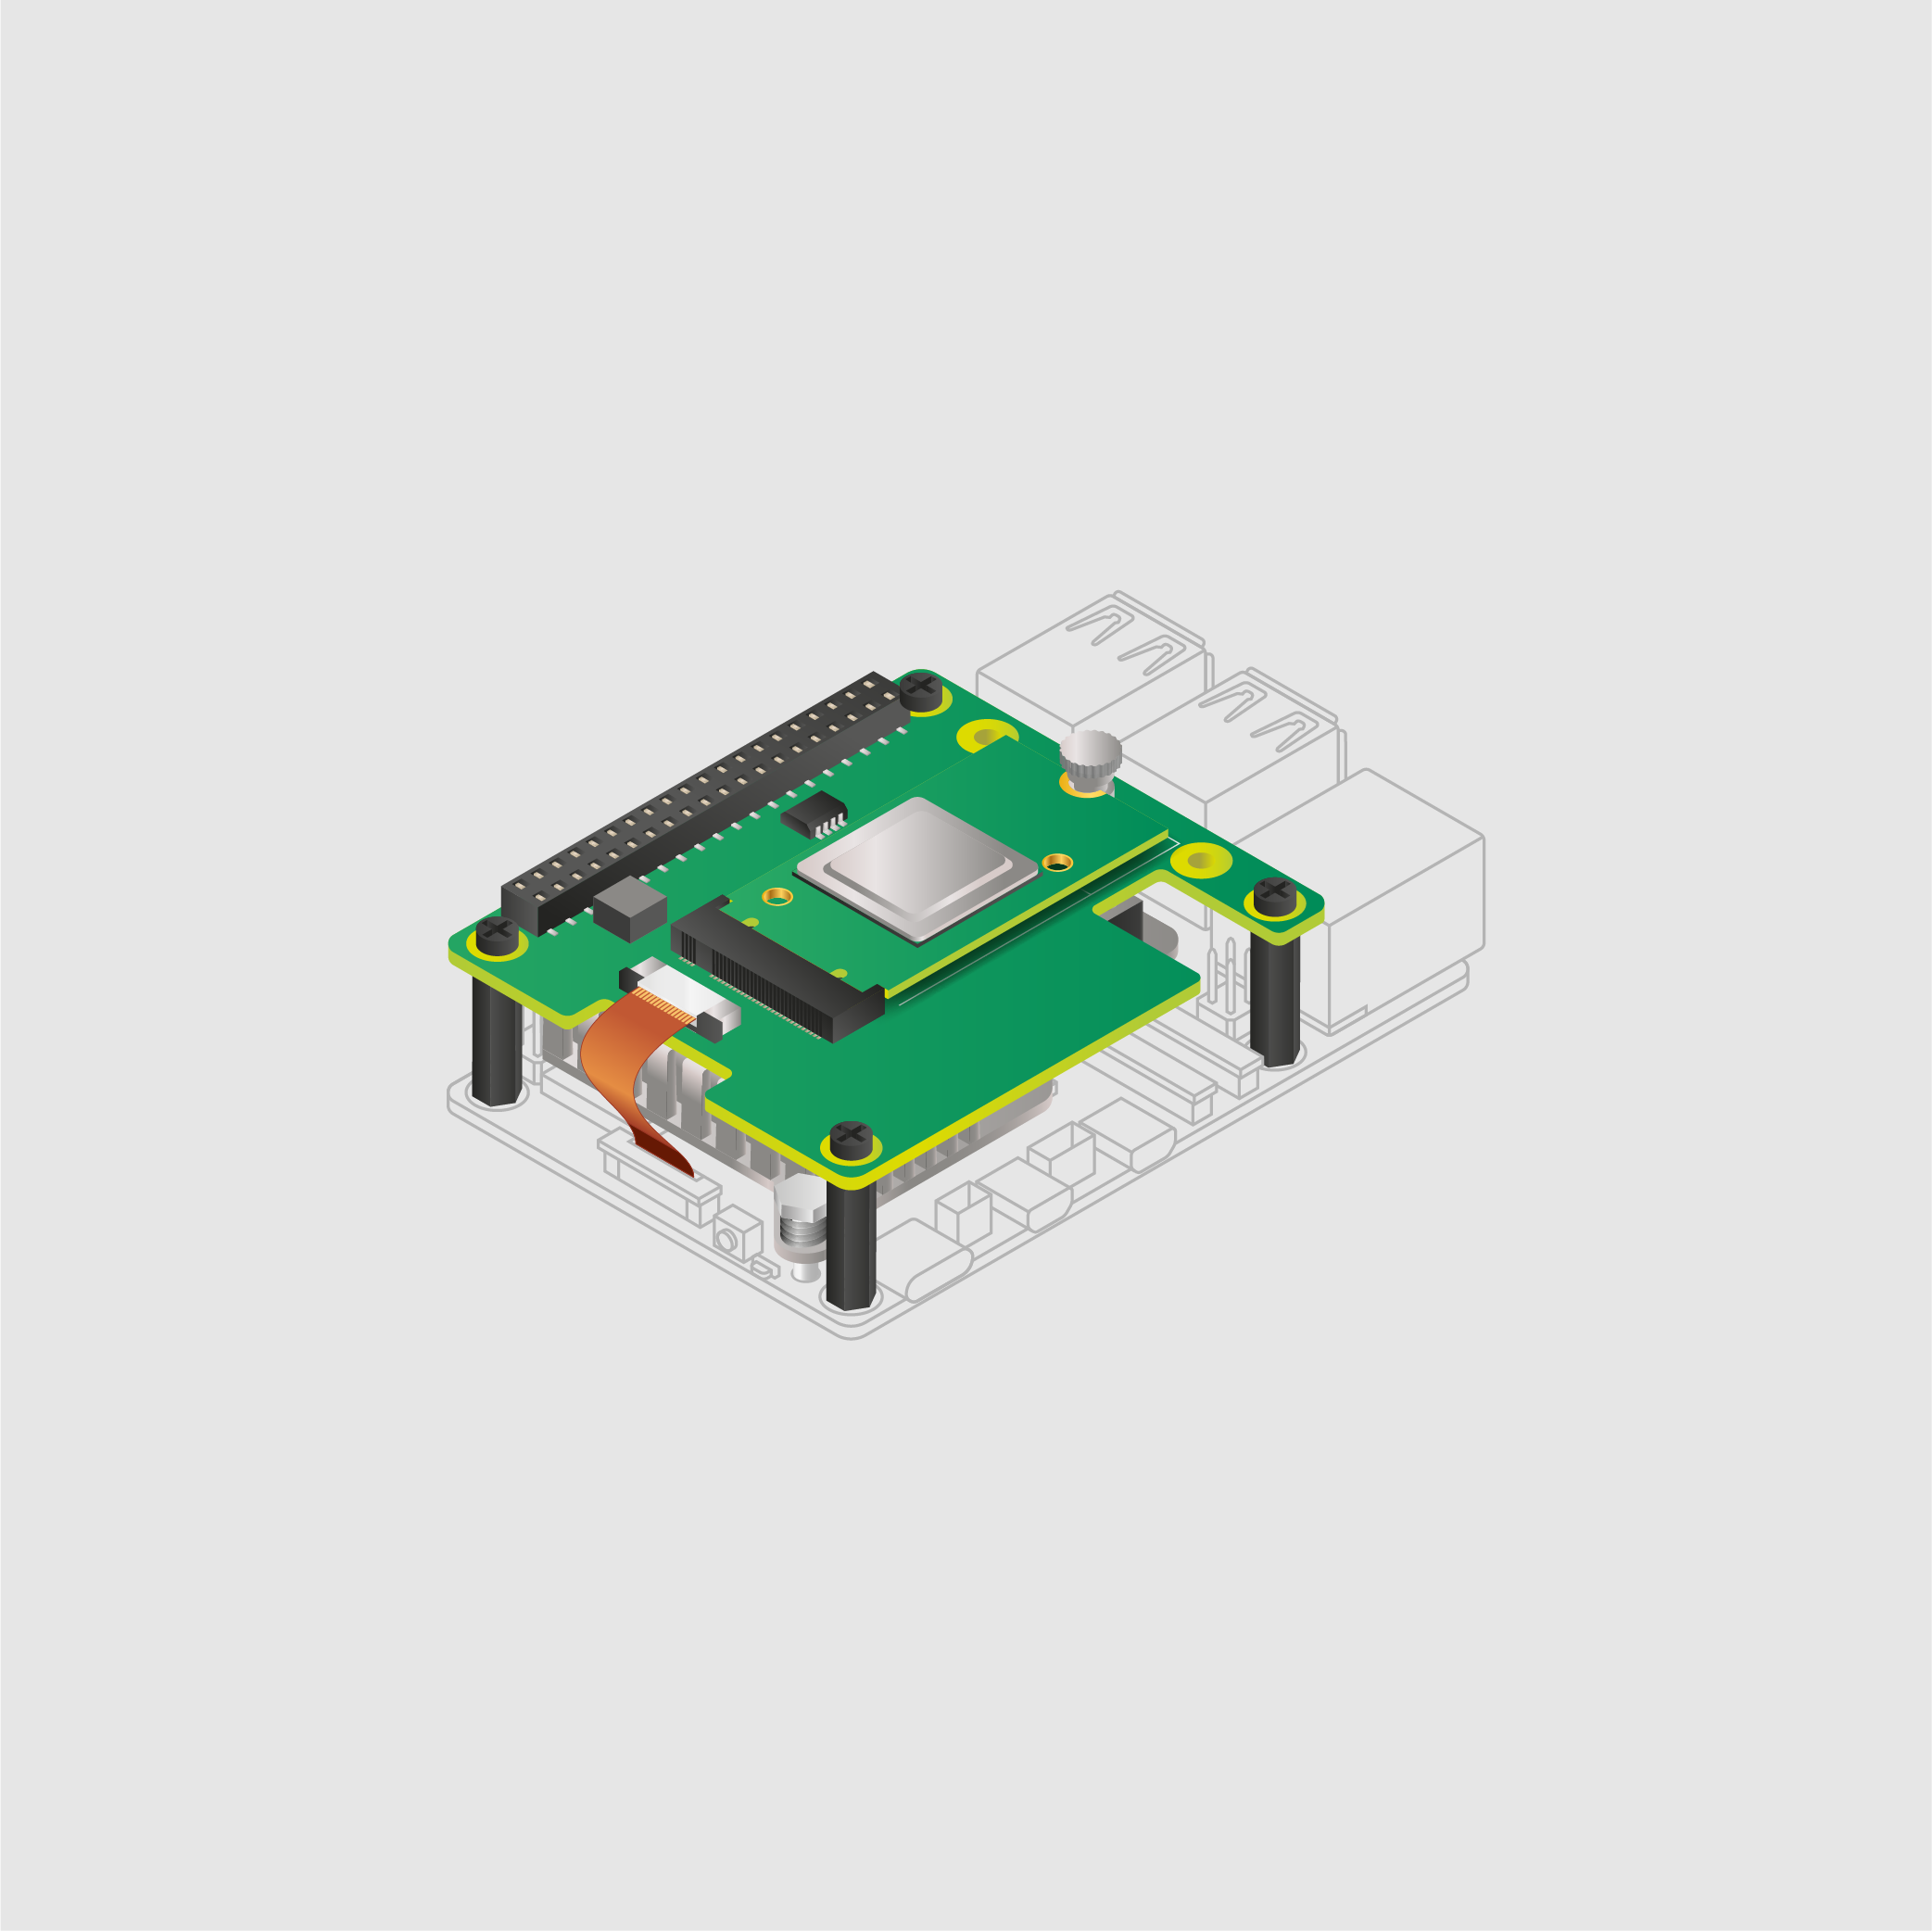
|
Warning
|
Always disconnect your Raspberry Pi from power before connecting or disconnecting a device from the M.2 slot. |
Boot from NVMe
To boot from an NVMe drive attached to the M.2 HAT+, complete the following steps:
-
Format your NVMe drive using Raspberry Pi Imager. You can do this from your Raspberry Pi if you already have an SD card with a Raspberry Pi OS image.
-
Boot your Raspberry Pi into Raspberry Pi OS using an SD card or USB drive to alter the boot order in the persistent on-board EEPROM configuration.
-
In a terminal on your Raspberry Pi, run
sudo raspi-configto open the Raspberry Pi Configuration CLI. -
Under
Advanced Options>Boot Order, chooseNVMe/USB boot. Then, exitraspi-configwithFinishor the Escape key. -
Reboot your Raspberry Pi with
sudo reboot.
For more information, see NVMe boot.
Enable PCIe Gen 3
|
Warning
|
The Raspberry Pi 5 is not certified for Gen 3.0 speeds. PCIe Gen 3.0 connections may be unstable. |
To enable PCIe Gen 3 speeds, follow the instructions at enable PCIe Gen 3.0.
Product brief
For more information about the M.2 HAT+, including mechanical specifications and operating environment limitations, see the product brief.